Why This Cornstarch & Dish Soap Bubble Dough Makes DIY Sensory Play Soft and Stretchy
Make Your Own Cornstarch & Dish Soap Bubble Dough: A Fun DIY Sensory Play Activity for Kids
Meta Description: Discover a quick and easy DIY sensory play activity with cornstarch and dish soap bubble dough! Perfect for creative playtime and bonding moments.
Introduction: The Joy of Messy Play
Hey there, fellow parents! Have you ever found yourself staring blankly at a rainy day, wondering how to keep your little ones entertained without the lure of screens? Or maybe you’ve faced the chaos of the kitchen as your mini tornadoes whirl around, demanding your attention every second. Believe me, I’ve been there!
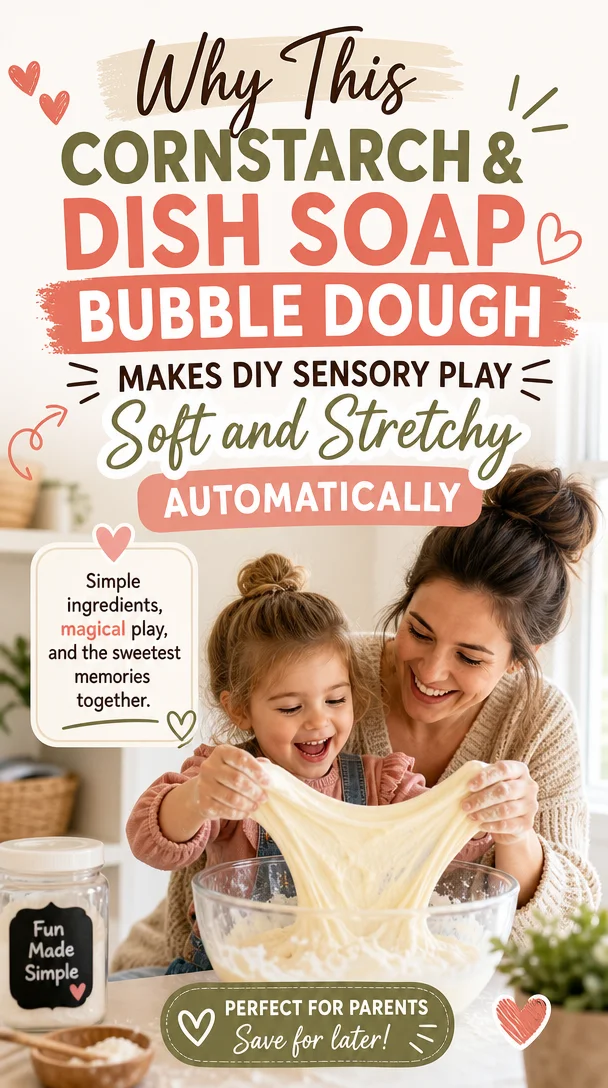
As parents, we crave activities that ignite our children’s creativity while also fostering life skills. That’s why I’m excited to share a delightful, DIY activity that requires just two ingredients and will leave your kids giggling and exploring. Welcome to the world of Cornstarch and Dish Soap Bubble Dough! This soft, stretchy, and oh-so-fun dough will transform your home into a magical sensory play zone. Plus, it’s an incredible opportunity for bonding and learning through play. So, grab your apron and let’s dive in!
What is Cornstarch and Dish Soap Bubble Dough?
You might be wondering, "What makes this bubble dough so special?" First off, it’s non-toxic, which means you can relax knowing it’s safe for your little ones. Secondly, it’s budget-friendly; with just cornstarch and dish soap, you can whip up a batch in no time. But the best part? It’s endlessly entertaining and will provide your kids with hours of exploratory fun!
Why Sensory Play Matters
Before we jump into the how-to, let’s talk a bit about sensory play. Engaging in activities that stimulate the senses helps kids develop critical skills, enhance creativity, and promote emotional regulation. When kids squish, mold, and stretch this bubble dough, they engage with textures, smells, and the thrill of making a mess (all of which are crucial for their development).
So, let’s embrace the mess and get started!
How to Make Cornstarch and Dish Soap Bubble Dough
Ingredients You Need
- 1 cup of cornstarch
- ½ cup of dish soap
Step-by-Step Instructions
-
Gather Your Materials
Ensure you have a bowl for mixing, a spatula or spoon, and a clean surface for play. An apron for your little one might be a good idea to keep the fun somewhat contained! -
Mix It Up
In your bowl, combine the cornstarch and dish soap. Start stirring with your spatula until you notice it begins to combine into a dough-like consistency. Don’t worry if it appears a bit crumbly initially; this is all part of the magic! -
Get Your Hands Involved
Once the mixture becomes tough to stir, it’s time for the hands-on part! Press your fingers into the dough, kneading it until it becomes soft and pliable. This step feels great for kids and is an excellent way for them to practice fine motor skills. -
Experiment with Consistency
If it’s too sticky, add more cornstarch. If it’s too crumbly, add a dash more dish soap. Encourage your kids to describe the texture and what they feel. Is it sticky? Soft? Stretchy? -
Playtime Begins!
Now that you’ve created your bubble dough, it’s time for the ultimate sensory experience! Let your kids explore, stretch, and mold their new creation. Use cookie cutters, rolling pins, or even just their hands to shape it into whatever they desire!
Engaging Ways to Play with Bubble Dough
Create a Bubble Dough Station
To elevate the fun, set up a sensory station. Include play mats or trays to contain the mess and provide a range of tools — think cookie cutters, plastic animals, or even a few toys. This encourages imaginative play and enhances their creative experience.
Bubble Dough Art
Encourage your little ones to create “art” with the dough! They can flatten it out and use various tools to create patterns or designs. Add some food coloring to the mix for colorful fun or sprinkle in some glitter for that extra pizzazz. Art is not just on the canvas; it can be enjoyed in the dough!
Themed Play Ideas
-
Under the Sea: Use ocean-themed toys, shells, or sea creatures to create a sensory experience where they can pretend they’re diving deep into the ocean.
-
Dinosaur Discovery: Add toy dinosaurs and create landscapes for their dino friends. Your kids can pretend they’re paleontologists on a fossil hunt!
-
Space Adventure: Represent planets with different colors of dough and transcend into a storytelling session about outer space.
Educational Moments in Play
While kids engage in play, take the opportunity to chat! Ask open-ended questions like, “What texture does it remind you of?” or, “Can you tell me what you’re making?” This promotes language development and strengthens your connection.
Helpful Tips for a Successful Sensory Play Experience
-
Preparation is Key: Set up a designated play area that’s easy to clean up after. You can even lay out butcher paper or an old sheet to catch any messes.
-
Encourage Exploration: Give your kids plenty of space to express themselves. If they want to mix colors or add unexpected items into the dough, let them! It’s all about exploration.
-
Keep It Fresh: Store leftover bubble dough in an airtight container for repeat play sessions. Just a little refresh by kneading it for a few minutes can make it ready to go again!
-
Embrace the Mess: Remember, the greatest lessons often come from the messiest moments. Don’t worry too much about the cleanup; consider it a small price for the immense joy and learning your kids are experiencing!
The Emotional Bonus of Sensory Play
As you witness your little ones engaged and delighted by this simple activity, you’ll likely feel a wave of satisfaction wash over you. It’s these moments that remind us how beautiful and fulfilling parenting really is. Sensory play not only works on fine motor skills and creativity but also provides a chance for connection and emotional expression.
After all, we’re all trying to navigate this parenting journey with kindness and joy. So, embrace those giggles, the flour-smeared little hands, and the creativity unfolding before your eyes. You’ll be glad you made the mess!
Conclusion: Celebrate Every Little Moment
In a world filled with parenting pressures and expectations, remember that sometimes, the simplest activities bring the most joy. Making Cornstarch and Dish Soap Bubble Dough serves not only to entertain but also to build lasting memories of exploration, creativity, and connection.
So go ahead! Gather your ingredients, embrace the mess, and let your kids’ imaginations soar. Celebrate every little win, every joyful giggle, and every colorful creation. You’re doing an amazing job, and I’m cheering for you every step of the way!
FAQ
1. How long does bubble dough last?
Store bubble dough in an airtight container in the fridge, and it can last for a week or longer.
2. Can I add color to the bubble dough?
Absolutely! Just a few drops of food coloring when mixing will yield vibrant colors that your kids will love.
3. Is this dough safe for toddlers?
Yes, both cornstarch and dish soap are non-toxic, making it a safe option for little hands.
Feel free to share your creations or ask any questions in the comments below! Remember, we’re all in this together, navigating the beautiful chaos of parenting with love and laughter. Happy playing!
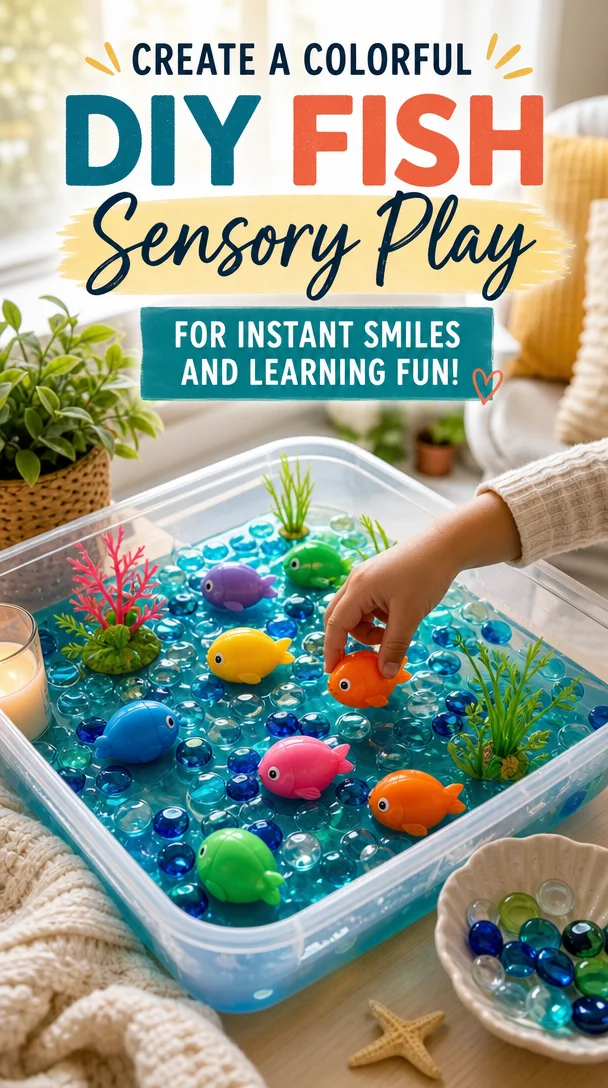
Create a Colorful DIY Fish Sensory Play for Instant Smiles and Learning Fun!
Dive into Fun with This DIY Sensory Fish Game for Toddlers!
Meta Description
Create a fun and engaging DIY sensory fish game for toddlers! Discover step-by-step instructions and tips for sensory play that sparks joy and creativity.
Introduction
Hey there, fellow parents! 🌼 If there’s anything we can all agree on, it’s that parenting can feel like a whirlwind of chaos, excitement, and pure magic all at once. Are you looking for a simple, engaging activity that delights your little ones and keeps them off screens? Today, I want to introduce you to a DIY sensory fish game that not only sparks joy but also nurtures your child’s curiosity and fine motor skills.
Creating this sensory game together can become a treasured bonding moment, filled with laughter and smiles. Plus, it’s an excellent way to encourage exploration and discovery—all while having fun! So, grab your supplies, and let’s dive in!
What is a DIY Sensory Fish Game?
A DIY sensory fish game engages toddlers in a tactile and visual experience. It allows them to squish, press, and explore textures while promoting creativity and imaginative play. Using simple materials, you can craft a colorful fish that holds a delightful surprise inside—water, glitter, and food coloring! It’s not just a game; it’s a chance for your child to explore textures, colors, and even cause-and-effect relationships.
Why Sensory Play Matters
Sensory play is crucial for your child’s development. Research shows that engaging in sensory activities strengthens brain pathways, which are vital for cognitive growth. Plus, it enhances fine motor skills, hand-eye coordination, and problem-solving abilities. In simpler terms, sensory play helps your little ones learn and grow while having a blast!
Getting Started: What You’ll Need
Before we jump into crafting this exciting sensory fish game, let’s gather our supplies! Here’s what you’ll need:
- Clear plastic sheet or laminating pouch
- Permanent markers (waterproof)
- Iron or hair straightener
- Water
- Food coloring (your favorite colors)
- Glitter (the more sparkly, the better!)
- Scissors
- Tape (optional)
Once you have everything on hand, let’s get crafty!
Step-by-Step Instructions to Create Your DIY Sensory Fish Game
1. Draw Your Fish
Start by drawing a fun fish shape on your plastic sheet with permanent markers. Let your creativity flow! Use bright colors and add cheerful details like scales or silly eyes. This part is all about having fun and personalizing your sensory game.
2. Seal the Edges
Using your hair straightener or iron, carefully seal the edges of your plastic sheet. Be sure to leave a large opening to fill it with your sensory mixture later. Pro tip: When cutting around your fish, leave about 2 cm of extra plastic around the edges. This helps prevent leaks and makes sealing much easier.
3. Prepare Your Sensory Mixture
Now for the fun part! Mix water with a few drops of food coloring and sprinkle in some glitter. The colors and sparkles will fascinate your toddler as they explore the sensory experience. Pour this mixture into the fish shape through the opening you left earlier. Watch your little one’s eyes light up with excitement!
4. Seal Everything Up
With the mixture inside, it’s time to seal the final opening. Carefully flatten out the plastic to remove excess air, then seal it off with your hair straightener or iron. Make sure it’s tightly closed to avoid any spills during playtime.
5. Bring on the Play!
Now, it’s time to let the fun begin! Hand your little one this delightful sensory fish and encourage them to squish, poke, and explore the texture. They’ll love the sensation of the water and glitter rushing around inside the fish!
Tips to Enhance the Sensory Experience
As you and your child enjoy this DIY sensory fish game, consider these additional ideas to keep the activity fresh and exciting:
Experiment with Materials
Change up the sensory mixture! Try using different colored water or even add small beads, foam shapes, or sequins to the mix. You can create a variety of sensory experiences, prompting discovery and conversation.
Include Themed Play
Use this activity as a part of a marine or ocean-themed day! Pair the sensory fish with books about ocean life, or set up a play area with stuffed sea creatures. This makes learning feel effortless and engaging.
Discuss Colors and Textures
While your child plays, engage them in conversation about the colors and textures they feel. Ask questions like, “How does it feel when you squish the fish? What colors do you see?” Helping them articulate their experiences fosters language development.
Encouraging Connections Through Sensory Play
This DIY sensory fish game not only offers hours of enjoyment but also creates a valuable opportunity for laughter and connection. As parents, we often feel the pressure to craft perfect memories, but it’s in these simple, unhurried moments that our children thrive.
1. Create Meaningful Moments
Take time to sit and play alongside your child. Share in their giggles, delight in their discoveries, and simply enjoy being present. These shared experiences build a strong bond, while providing your little ones with reassurance and comfort.
2. Celebrate Their Achievements
As your child interacts with the sensory fish, celebrate their curiosity. Whether they notice a new color swirling inside or point out a unique texture, these small wins matter. Offer praise and encouragement for their explorations!
3. Capture the Memories
Snap a few pictures of your child getting lost in the sensory experience! These photos will become cherished reminders of the joyful moments spent together as a family. You can create a scrapbook or a digital album to look back on these memories.
Conclusion: Enjoying Parenthood, One Sensory Project at a Time
In the whirlwind of parenting, it’s easy to feel overwhelmed. Remember, you don’t need to strive for perfection; instead, focus on creating meaningful moments filled with joy and laughter. This DIY sensory fish game is more than just an activity; it’s a chance to connect, explore, and, most importantly, embrace the beautiful chaos of family life.
So, gather those supplies, channel your inner artist, and dive into this colorful adventure with your toddler. You’re doing an amazing job, and these little moments will create a bond that lasts a lifetime. Happy crafting! 💖
FAQs
Q1: How can I store the sensory fish when not in use?
A1: Store your sensory fish flat in a cool place to prevent any leaks. If it becomes too squished, reseal it with an iron!
Q2: Can I use other designs instead of a fish?
A2: Absolutely! Get creative with different marine animals, shapes, or themes. Let your child’s interests guide the designs.
Q3: Is this activity safe for all ages?
A3: While toddlers love sensory play, ensure adult supervision, especially with younger kids, to avoid any choking hazards.
Feel free to spread the magic of this DIY sensory fish game with your fellow parents on social media. Together, we can create a supportive community, sharing tips, tricks, and the joys of family life!