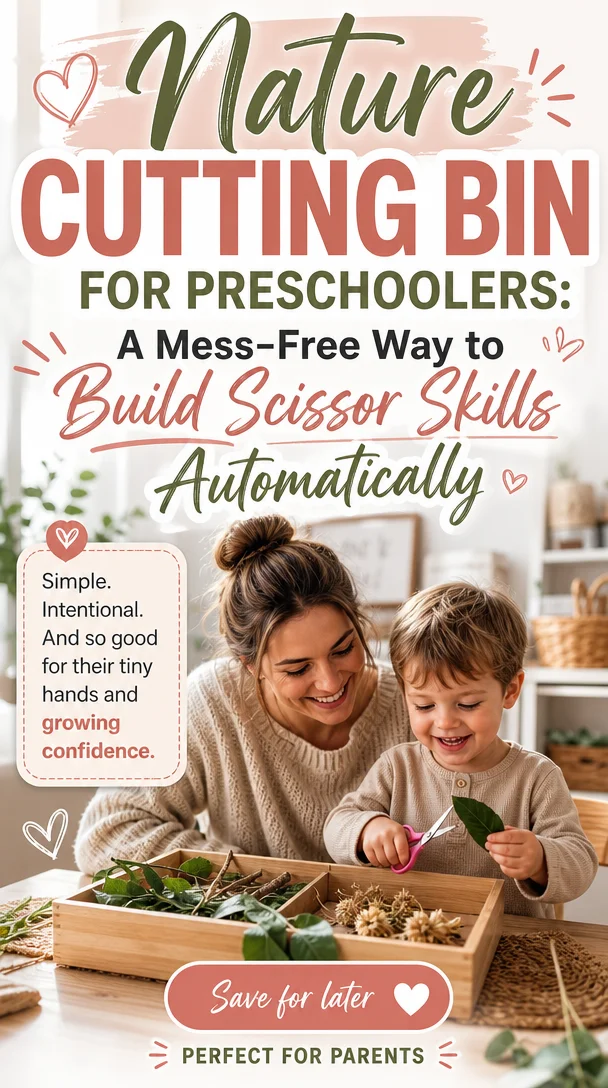
Nature Cutting Bin for Preschoolers: A Mess-Free Way to Build Scissor Skills
Unleash Creativity with a Nature Cutting Bin: A Delightful Activity for Preschoolers
Meta Description: Discover a fun, free activity for preschoolers with a DIY nature cutting bin. Encourage scissor skills while exploring the outdoors!
Introduction
Ah, the beauty of childhood! There’s something incredibly magical about watching your little ones explore the world around them. Yet, as parents, we often find ourselves pondering how to channel that bubbling energy into creative and educational activities. Enter the nature cutting bin—a game-changer for busy toddlers eager to learn while having fun!
Imagine your preschooler snipping away at colorful clippings from your yard, developing fine motor skills all while having a blast. Sounds fantastic, right? This hands-on experience not only entertains but also fosters their creativity and dexterity. Plus, it costs nothing but a little time and the treasures Mother Nature provides.
So, let’s dive into everything you need to know about creating this engaging nature cutting bin and how it can brighten your family’s day!
What is a Nature Cutting Bin?
A nature cutting bin is a simple sensory activity where your child explores various natural materials—think twigs, leaves, flowers, and more—using scissors to cut and interact with them. This activity marries outdoor play with fine motor skill enhancement, creating a perfect blend for curious minds.
By providing a mix of textures, colors, and shapes, you give your little one the chance to experiment and learn in an inviting way!
Why Choose a Nature Cutting Bin for Your Preschooler?
1. Encourages Scissor Skills
For preschoolers, mastering scissor skills lays the foundation for future writing and crafting. Children learn to open and close the scissors, strengthen grip, and start controlling their cutting line, making this an essential skill-building activity.
2. Fosters Creativity and Imagination
When your child rambles through the yard or a nearby park collecting materials, they engage in imaginative play. The simple act of picking up nature’s treasures sparks creativity, and cutting those items allows them to express their ideas visually.
3. Promotes Outdoor Exploration
With so much screen time these days, outdoor exploration is more important than ever. This activity not only gets your little one outside but also instills a love for nature and its boundless lessons.
4. Offers Sensory Stimulation
The variety of textures and smells in a nature cutting bin provides rich sensory experiences. Children develop tactile sensitivity as they handle everything from soft petals to rough tree bark.
5. Strengthens Parent-Child Bonding
Activities that involve hands-on engagement create wonderful opportunities for conversation, shared laughter, and meaningful memories. As you join your child in this exploration, cherish these moments together!
How to Create Your Own Nature Cutting Bin
Creating a nature cutting bin is incredibly simple and requires minimal materials. Here’s how to get started:
Step 1: Gather Supplies
- Natural Materials: Go for a variety of items—twigs, leaves, grass, flowers, and even some stones if you want to mix it up.
- Scissors: Child-safe scissors work best for preschoolers. They should be lightweight and easy to grip.
- Container: An outdoor bin or a simple tray will suffice to keep things organized.
- Optional: Magnifying glass for closer inspections, paper for collecting cuttings, and a small bag for collecting items.
Step 2: Head Outside
Take a walk with your child, encouraging them to collect anything that catches their eye. This part of the activity allows for lots of discussions about what they find. Ask questions like, “What color is this flower?” or “How does this leaf feel?”
Step 3: Set Up the Cutting Bin
Arrange your collected treasures in the container or tray. If you’re using paper, place it beneath the materials. When your child is ready, have them explore the bin, encouraging them to cut different items.
Step 4: Encourage Exploration
As your child engages with the materials, offer some gentle prompts. You might say, “Can you find the longest piece of grass?” or “What happens if you cut this leaf?” This will encourage both exploration and conversation!
Step 5: Celebrate Their Work
Once your child has finished cutting, celebrate their creations! You could create a nature collage together or make a “nature scrapbook” to store their favorite pieces. This celebratory step helps your child feel proud of their efforts.
Tips for Success: Make the Most of Your Nature Cutting Bin
1. Create a Safe Cutting Environment
Safety comes first! Ensure your child has enough room to cut freely, and always supervise them while they use scissors. Teach proper scissor handling beforehand to prevent accidents.
2. Keep it Simple
Don’t overwhelm your child with too many materials. A few key items will suffice to spark their creativity. In fact, working with fewer materials often leads to more imaginative play!
3. Incorporate Learning
Use this time to weave in educational elements. Discuss colors, shapes, and sizes as they cut. Count pieces together, identify different plants, or even introduce simple science concepts like decomposing leaves.
4. Allow for Free Play
While some structure is helpful, allow your child space for free exploration. They might surprise you with ways they choose to engage with the materials!
5. Mix it Up
Change up the contents of your cutting bin each time or use materials from different seasons to keep it fresh and exciting.
Nature Cutting Bin Variations
Here are some fun variations to consider for your cutting bin:
Seasonal Themes
- Spring: Focus on soft flowers and vibrant greens.
- Summer: Incorporate sturdy leaves and colorful butterflies.
- Autumn: Use colorful leaves, pine cones, and twigs.
- Winter: Add dried out stems or even past holiday decorations like holly.
Adding a Sensory Component
Introduce other sensory materials like water beads, sand, or clay to enhance your cutting experience. Let your child cut items and then mix them with these sensory delights for a multi-faceted playtime.
Encouragement: Let’s Keep Going!
As we wrap up our discussion about creating a nature cutting bin, remember that not every activity will be a perfect hit. Sometimes the weather doesn’t cooperate, or distractions creep in. That’s okay!
What’s important is offering your child consistent opportunities for growth, exploration, and fun. Celebrate both the success and the struggles along the way, and cherish the joyful connections you’re fostering.
Next time you’re feeling a little heat from the chaos of parenting, take a step back and consider a simple, free activity like the nature cutting bin. It’s these small moments that often make the biggest memories.
Conclusion
Creating a nature cutting bin gives your preschooler so much more than just an enjoyable activity; it nurtures their fine motor skills, sparks creativity, and strengthens the bond between you two. So gather those leaves, grab those scissors, and let the cutting begin! Parenting isn’t perfect, but it can certainly be an adventure—full of laughter, lessons, and a sprinkle of nature’s magic.
Optional FAQ Section
Q: What if my child doesn’t want to cut the nature items?
A: Encourage other forms of play! Perhaps they’d enjoy just exploring the textures or making a nature-themed craft. Keep it light and let their interests guide the activity.
Q: How often should I set up a nature cutting bin?
A: Regularly! But listen to your child. If they find it repetitive, mix up the materials or take a break. The goal is to keep it fun and engaging!
Q: What age group is this activity suitable for?
A: The nature cutting bin is fantastic for toddlers and preschoolers, ideally ages 2-5, but older kids can enjoy it too by incorporating more complex cutting and crafting projects!
Happy cutting, and enjoy every beautiful little moment with your little explorer! 💚
What Your Kids Learn from Leaf Stamping: A Colorful Nature Activity
Leaf Stamping Nature Activity for Kids: A Fun and Simple Science Adventure
Meta Description
Discover the joy of leaf stamping! This easy nature activity for kids combines creativity and science, making family bonding moments unforgettable.
Introduction
Have you ever watched your little ones marvel at the world around them? From the fluttering of butterfly wings to the crunching of leaves underfoot, nature provides endless wonders just waiting to be explored. As parents, we strive to nurture that curiosity, but let’s be real—finding engaging, easy activities can feel overwhelming. That’s where a delightful discovery like leaf stamping comes in!
Imagine your child’s face lighting up as they create colorful art with leaves they gathered from your backyard. Leaf stamping is a simple yet enchanting way to combine creativity with a dash of science—and it’s perfect for those glorious afternoons spent outdoors. This activity not only fosters creativity but also helps your kids appreciate the beauty of nature while learning about the different types of leaves and their textures. Get ready to step outside, embrace a bit of mess, and make warm, lasting memories with your kids!
What is Leaf Stamping?
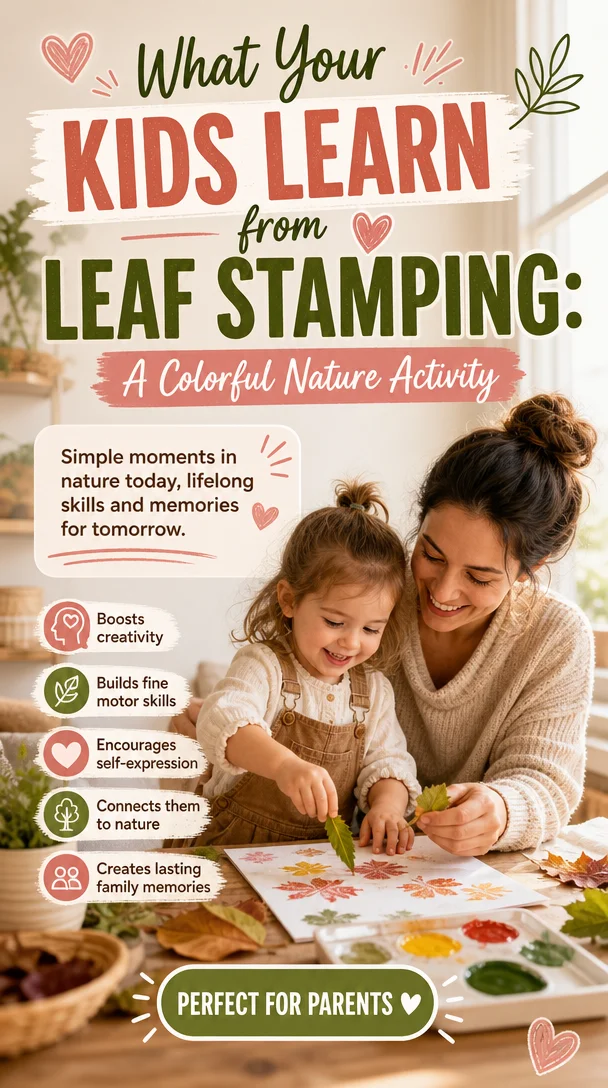
Leaf stamping is an imaginative craft that involves using leaves as stamps to create stunning prints on paper. This activity allows your children to explore various colors, shapes, and patterns while connecting with nature. Plus, it offers a fun and hands-on way to learn about plant life!
While the process is straightforward, the potential for creativity is limitless. Kids can experiment with different types of leaves, colors, and techniques, making this activity suitable for toddlers and older children alike. Let’s dive into how to get started with this exciting nature activity!
The Benefits of Leaf Stamping
Encourages Creativity
Kids naturally express their emotions through art. Leaf stamping offers them a unique medium to showcase their creativity. With just a few materials, they can create beautiful, one-of-a-kind masterpieces that reflect their personalities.
Connects with Nature
Stepping outside allows your kids to appreciate the beauty of nature firsthand. They engage their senses as they touch different leaves, observe intricate details, and breathe in the fresh air. This connection to nature nourishes their curiosity.
Boosts Learning Opportunities
Leaf stamping provides an excellent backdrop for teaching moments! Talk about various tree species, explore shapes and colors, and even engage in discussions around the science of photosynthesis as you stamp away. Learning doesn’t get much more fun than this!
Enhances Fine Motor Skills
Using paint and stamping requires coordination and fine motor control—perfect for helping kids sharpen their skills. As they dip the leaves in paint and press them onto paper, they develop hand-eye coordination and strength in their hands.
How to Prepare for a Leaf Stamping Adventure
What You’ll Need
Before you head out to start your leaf stamping journey, gather the materials you’ll need. Here’s a quick checklist:
- Leaves of different shapes and sizes (maple, oak, and ferns work well)
- Non-toxic paint (washable tempera paint is great)
- Paper (cardstock or any sturdy paper)
- Paintbrushes (optional)
- Container for the paint
- Newspaper or a plastic tablecloth (for less mess)
- Wet wipes or paper towels (for easy cleanup)
Choosing Leaves
Before you start stamping, take a nature walk with your kids to gather leaves. Encourage them to explore different types of leaves and engage their curiosity. Ask questions like:
- What does this leaf feel like?
- What color is the leaf?
- What tree do you think this leaf came from?
This discovery process makes the activity even more engaging!
Step-by-Step Guide to Leaf Stamping
Now that you’ve gathered everything you need, let’s dive into the fun part! Here’s how to execute the leaf stamping activity:
Step 1: Prepare Your Workspace
Lay down newspaper or a plastic tablecloth to protect your surfaces. Getting a little messy is part of the fun, but it’s nice to have a designated area to work in!
Step 2: Set Up Your Paint
Pour some non-toxic paint into a container. You can use different colors for more vibrant prints. If your kids are feeling adventurous, let them mix colors for unique shades!
Step 3: Paint the Leaves
Using a paintbrush or directly dipping the leaves into the paint, cover one side of a leaf with paint. Make sure the leaf is well-coated, but not dripping!
Step 4: Stamp on Paper
Press the painted side of the leaf onto your piece of paper. Encourage your children to press gently but firmly to ensure an even transfer. For a more intricate design, they can try applying different pressure levels or angle the leaves in various directions.
Step 5: Repeat and Experiment
Let your kids explore! They can use various leaves, mix different colors, and even layer prints for more effect. This is their chance to be artists, so let their imaginations run wild!
Step 6: Clean Up
Once you’ve finished stamping, take a moment to clean up with wet wipes or a damp cloth. Teaching kids about cleanup is another valuable life lesson!
Ideas to Enhance the Leaf Stamping Experience
Explore Nature Further
Take your leaf stamping to the next level by going on a mini-scavenger hunt! Give your kids a list of items to find in nature, such as acorns, interesting rocks, or flowers. This twist adds an element of adventure to your day out.
Create Seasonal Art
Use leaf stamping to create seasonal décor! Consider making autumn leaf prints to decorate your home for fall or colorful spring leaf art as part of your garden theme. Transform their artwork into greeting cards or a wall gallery.
Discuss What You Discover
While you stamp, take the opportunity to discuss nature’s wonders. Ask questions like:
- What colors do you see in nature?
- How do leaves change with the seasons?
- What types of animals might live in the trees?
Encouraging dialogue nurtures your little ones’ curiosity and enhances their learning experience.
Connect with Other Families
Consider organizing a leaf stamping playdate with your friends! Invite other families over for an afternoon of art, laughter, and creativity. Sharing parenting moments with others always lightens the load!
Helpful Tips for a Successful Leaf Stamping Experience
-
Choose the Right Leaves: Opt for leaves with interesting shapes and textures for more exciting prints. Experiment with different tree species for variety!
-
Experiment with Colors: Let your kids mix and match colors to create new shades. This adds an element of surprise to each print!
-
Use Sturdy Paper: Ensure you choose quality paper that can handle the paint. Cardstock works wonderfully!
-
Practice Makes Perfect: If your child struggles initially, encourage them to keep trying. Affirm that creativity takes practice!
-
Celebrate Their Masterpieces: Display their creations proudly! This boosts their confidence and creates a sense of accomplishment.
Conclusion
Leaf stamping is more than just a fun craft, it’s an opportunity to explore, learn, and bond as a family. Allow your children to bask in the beauty of nature while expressing themselves creatively. Remember, it’s not about achieving perfection; it’s about making memories and celebrating each little discovery together.
As you step into this activity, keep in mind that every brushstroke and print is a step towards nurturing their creativity and curiosity. So gather your supplies, head outside, and let the adventure unfold. You’re not just making art—you’re creating moments that matter.
Optional FAQ Section
Q: What age is this activity suitable for?
A: Leaf stamping is suitable for kids aged 3 and up. Younger children will need guidance, while older kids can enjoy experimenting more independently.
Q: Can we use other materials for stamping?
A: Absolutely! In addition to leaves, you can experiment with flowers, vegetables, or even sponges for different effects.
Q: What if my child is hesitant to try?
A: Encourage them gently! Sometimes a little exploration can spark their interest. Join in and show them how fun the process can be!
Q: How can we extend this activity?
A: Use stamp prints to create a personalized storybook where each page represents a different leaf stamping adventure!
Now, go ahead—let the colors, textures, and fun transform your day into an unforgettable family adventure!