
From Calm Corners to Fidget-Filled Fun: Sensory Room Ideas for Schools
30 Must-Try Sensory Room Ideas for Schools
Meta Description
Explore 30 must-try sensory room ideas for schools to create calming environments that support students’ emotional and sensory needs.
Introduction
As parents, we often witness the overwhelming emotions our children face in a world that demands so much from them. In schools, these feelings can multiply, leading to stress, anxiety, and a sense of disconnect. That’s where sensory rooms come into play! They provide safe havens where students can process their emotions and recalibrate their senses. Imagine walking into a vibrant, engaging space designed solely to help children relax, focus, and feel more in control. Sounds amazing, right? Let’s dive into 30 sensory room ideas that can transform an ordinary classroom into a sanctuary of calm.
Why Sensory Rooms Matter
Sensory rooms offer significant benefits for students, especially for those with sensory processing issues, autism spectrum disorder, or anxiety. These spaces provide therapeutic experiences that help students manage overwhelming sensory environments they often encounter in traditional classrooms.
- Emotion Regulation: Sensory rooms equip students with tools to handle their emotions effectively.
- Focus Enhancement: A designated space allows students to refocus their energy and concentration.
- Stress Relief: Engaging in sensory activities can significantly reduce stress and anxiety levels.
30 Must-Try Sensory Room Ideas
Creating an inviting and effective sensory room is a journey filled with creativity and understanding. Here are 30 sensory room ideas that you can incorporate to make the most out of this safe space.
H2: 1. Calming Corner
Set aside a small nook filled with soft pillows and cozy blankets. This space helps children retreat for a few moments of quiet.
H2: 2. Interactive Wall Panels
Use textured panels that students can touch and manipulate. These panels offer various sensory experiences, from smooth to rough surfaces.
H2: 3. Sensory Bins
Fill bins with rice, foam beads, or sand. Provide containers, scoops, and molds, encouraging students to engage in tactile play while honing fine motor skills.
H2: 4. Aromatherapy
Incorporate essential oil diffusers with calming scents like lavender and chamomile. These aromas can aid relaxation and create a soothing atmosphere.
H2: 5. Playdough Station
Set up a dedicated area for playdough. Kneading and molding it can help relieve tension and encourages creativity.
H2: 6. Light Projector
Incorporate a light projector that displays soothing images on the walls or ceiling. Gentle movements can provide a captivating visual experience, helping students decompress.
H2: 7. Weighted Blankets
Add weighted blankets to the room for students who benefit from deep pressure. These can be effective in reducing anxiety and promoting calm.
H2: 8. Sound Machine
Include a sound machine or calming music. Soft sounds can drown out distracting noises and help students focus.
H2: 9. Fidget Toys
Stock the room with various fidget toys like spinners, squishies, and textured balls. These toys allow students to release excess energy and keep their hands busy.
H2: 10. Soft Lighting
Turn off harsh overhead lights and use floor lamps or fairy lights instead. Soft lighting creates a warm, welcoming atmosphere that’s conducive to relaxation.
H2: 11. Nature Elements
Incorporate plants or natural elements. Bringing the outside in helps students feel grounded and connected to nature.
H2: 12. Bubble Tube
Install a bubble tube to capture students’ attention and provide a visual sensory experience. The calming movement of bubbles can be mesmerizing.
H2: 13. Swing or Hammock
Add a swing or a hammock for students to rock back and forth. This gentle motion can be very soothing and offers a unique sensory experience.
H2: 14. Textured Carpet
Install soft, textured carpet or mats that provide comfort underfoot. Different textures can stimulate sensory exploration.
H2: 15. Balance Equipment
Include balance boards or wobble stools to help students develop coordination. These tools also provide a fun outlet for excess energy.
H2: 16. Quiet Jar
Create jars filled with glitter and water. Shaking them up creates a visual calming tool that students can watch as the glitter settles.
H2: 17. DIY Sensory Bottles
Make sensory bottles filled with various materials like beads, oil, glitter, and water. These engaging creations capture attention and can be shaken for calming moments.
H2: 18. Tactile Wall
Design a tactile wall that features various textured materials for students to feel. This interactive element promotes sensory exploration with each touch.
H2: 19. Visual Schedules
Use visual schedules or charts as a guide for activities. These can help students understand what to expect and reduce anxiety about transitions.
H2: 20. Exercise Balls
Incorporate exercise balls for students who need to bounce a bit to focus. These can help provide both movement and a sensory outlet.
H2: 21. DIY Paint Station
Set up a section for creative art using safe, squishy paints. Expressive art allows students to release emotions while engaging their senses.
H2: 22. Bubble Wrap Space
Let students pop bubble wrap as a fun and satisfying way to relieve stress. The tactile sensation feels amazing and serves as a quick emotional release.
H2: 23. Sand Table
Fill a sand table for tactile play. Students can explore while developing fine motor skills and creativity through creative play.
H2: 24. Calming Colors
Choose calming color palettes for the room. Soft blues, greens, and pastels create a soothing environment that fosters relaxation.
H2: 25. Yoga Mats
Use yoga mats in the sensory room for movement activities. Encourage stretching and simple yoga poses to help students center themselves.
H2: 26. Communication Tools
Create a communication corner with visuals or cards to help express emotions. These tools assist students who may find it difficult to verbalize their feelings.
H2: 27. Nature Sounds
Play recordings of nature sounds, such as rain or ocean waves. This can create a peaceful background while students engage in sensory activities.
H2: 28. Q&A Board
Include a Q&A board where students can write down their feelings and ask questions. This tool helps them articulate their thoughts and connect with one another.
H2: 29. Sensory Stories
Share sensory stories that incorporate various textures and sounds. These experiences engage multiple senses and spark imagination.
H2: 30. Reflection Area
Designate a space for reflection where students can self-assess their feelings through journaling or drawing. This encourages emotional growth and mindfulness.
Helpful Tips for Implementation
-
Collaborate with Educators: Work closely with teachers and staff to tailor sensory room ideas to your school’s unique needs. Gather input on what works best for students and adapt as necessary.
-
Engage Students: Involve students in the design process. Ask for their ideas on what they feel would help them relax and focus most effectively.
-
Keep It Flexible: A sensory room should evolve. Be open to changing activities and items based on student feedback and usage patterns.
-
Set Guidelines: Establish clear guidelines for using the sensory room to ensure it remains a safe and positive experience for everyone.
Encouraging Conclusion
Creating a sensory room in a school can be a game-changer for students seeking comfort and focus amidst the chaos of education. By incorporating these 30 sensory room ideas, you can design an environment that supports emotional regulation, encourages exploration, and fosters connection. Remember, every child’s needs are unique, so keep experimenting with activities that resonate with them. Embrace the messy, beautiful journey of creating a safe, calming space for your students. Together, we can make school feel a little lighter, warmer, and more joyful—one sensory experience at a time. You are doing an incredible job, and your dedication to your children’s well-being truly matters!
Optional FAQ Section
Q: How often should students use the sensory room?
A: Allow students to use the sensory room as needed. Some may require short breaks throughout the day, while others may prefer a longer, dedicated time for calming.
Q: What types of students benefit from sensory rooms?
A: Sensory rooms benefit students with sensory processing disorders, autism, anxiety, ADHD, and those who simply need a moment to regroup.
Q: Can parents help with sensory room ideas?
A: Absolutely! Parents often have valuable insights into their children’s needs. Encourage them to share ideas that might work well in the sensory space.
Creating a nurturing environment for students can have lasting impacts on their emotional and academic success. Let’s keep pushing those boundaries together!
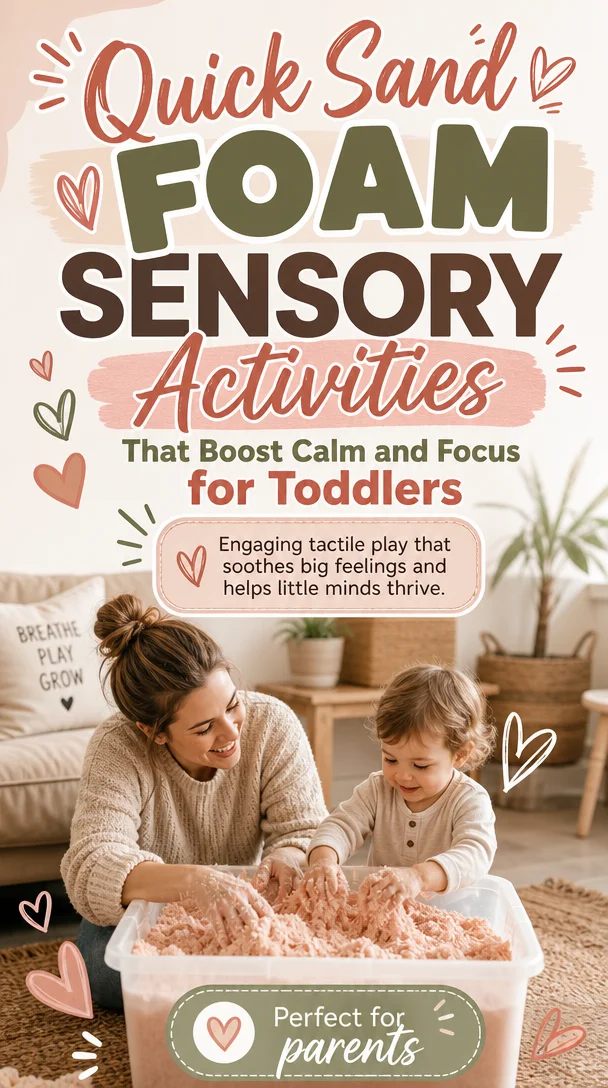
Quick Sand Foam Sensory Activities That Boost Calm and Focus for Toddlers
Sand Foam Sensory Play: A Fun and Easy Summer Activity for Kids
Meta Description
Discover how to create sand foam sensory play in just minutes! This engaging summer activity promotes creativity and sensory exploration—perfect for toddlers and preschoolers.
Introduction
As parents, we all know that summer can sometimes feel like a never-ending search for activities to keep our little ones happy and engaged. You want them to enjoy their time away from screens, to explore and create, but planning can often feel overwhelming. Enter sand foam sensory play—an easy, delightful, and oh-so-fun activity that requires minimal prep and maximum enjoyment!
Imagine your child’s face lighting up as they dig their hands into soft, fluffy foam, squishing and molding it into whatever their imaginations can conjure. It’s not just about having fun; sensory play encourages creativity, fine motor skills, and emotional development. Plus, it gives you a well-deserved moment to sip your coffee while they explore (and make a delightful mess!).
So, let’s dive into how to set up this fabulous summer activity that brings joy to your family—all while keeping the pressure off you, the parent!
What is Sand Foam Sensory Play?
Sand foam is a fantastic sensory material that resembles sand but feels light and airy, offering a unique tactile experience for children. It’s easy to mold, shape, and play with, allowing kids to create anything from castles to ocean creatures right in their backyard or living room.
Benefits of Sensory Play for Kids
- Encourages Exploration: Sensory play sparks curiosity, allowing children to discover new textures and sensations in a safe environment.
- Boosts Creativity: Kids can unleash their imaginations as they manipulate the foam, creating different shapes and structures.
- Enhances Fine Motor Skills: Squeezing, rolling, and forming shapes help improve hand-eye coordination and fine motor development.
- Promotes Emotional Regulation: Engaging with sensory materials can calm children, helping them to express emotions and process their feelings.
How to Prepare Sand Foam
Now that we’ve established the myriad benefits of sand foam sensory play, let’s get down to the nitty-gritty of how to prepare it! The best part? You likely have most of the ingredients at home.
Supplies Needed
- Sand (play sand or kinetic sand works great!)
- Shaving Cream (look for an unscented variety if your child has sensitivities)
- Mixing Bowl
- Spoon or Hands for Mixing
- Optional Add-Ins: Food coloring, glitter, small toys, or shells for extra sensory elements!
Step-by-Step Instructions
-
Mix the Sand and Shaving Cream: Start by adding equal parts sand and shaving cream to a mixing bowl. If you want a fluffier texture, adjust the proportions by adding more shaving cream.
-
Stir it Up: Use a spoon or your hands to mix thoroughly until the sand absorbs the foam. You want it to hold together firmly but still feel light and airy.
-
Add Color and Texture: For added fun, include a few drops of food coloring or sprinkle in some glitter. Let your little ones get creative by adding small toys or seashells to inspire imaginative play!
-
Storage: If you don’t use all the sand foam in one session, you can store it in an airtight container for a few days. Just give it a quick mix before using again!
Ideas for Playtime
Once your sand foam is ready, the possibilities are endless! Here are some engaging ideas to get your kiddos playing:
Sandbox Adventure
Set up a mini sandbox area using a shallow bin filled with your sand foam. Provide toy shovels, buckets, or molds so they can build and dig to their heart’s content.
Sensory Bin Exploration
Create a sensory bin by adding your sand foam and mixing in different elements. Incorporate water beads, dried beans, or small toy animals to enhance the experience. It creates a multi-layered sensory exploration that will keep even the most active toddlers engaged!
Nature Play
If you’re outside, encourage your little ones to gather small sticks, leaves, or flowers. They can incorporate natural elements into their foam play, creating miniature landscapes or imaginary worlds.
Themed Story Time
Combine sensory play with storytelling! Choose a nature-themed book, then use the sand foam as a tactile activity while reading. Encourage your kids to recreate scenes from the story with the foam.
Helpful Tips to Make the Most of Sand Foam Sensory Play
- Worried About the Mess? Lay down a plastic tablecloth or old sheets to protect your floors. Embrace the mess—it’s part of the fun!
- Engage with Your Child: Join in the play! Ask open-ended questions like, “What are you building?” or “How does it feel?” to foster communication and deepen your connection.
- Use Different Textures: Mix in other materials, such as rice or beans, for a varied sensory experience. Let kids compare the textures and talk about how they feel.
- Incorporate Learning: Use this activity as a springboard for learning. Introduce simple math concepts by counting how many shells they find, or talk about colors while adding food coloring!
Conclusion
As summer unfolds, creating memorable moments with your kids can sometimes feel daunting. But activities like sand foam sensory play offer an easy way to engage their creativity and sense of wonder—without added stress for you. Remember, it’s all about the experience, not perfection! Your child will cherish these silly, messy, and joyful moments.
So, take a deep breath and enjoy the process. You’re doing an amazing job, and every little moment counts. If you’re ever in doubt, just remember: messy play often leads to the best memories. Happy playing!
Optional FAQ Section
How long does sand foam last?
When stored in an airtight container, sand foam typically lasts for around 3-5 days.
Can I make sand foam without shaving cream?
Yes! You can experiment with alternatives like whipped soap or even cornstarch mixed with water for a different texture.
Is sand foam safe for toddlers?
Absolutely! Just ensure they don’t ingest it and monitor them during play. If you choose to use glitter or small items, ensure they are safe and non-toxic.
Final Thought
Feel free to experiment with your own twist on sand foam sensory play—make it as unique as your family! Enjoy every little moment; they truly matter.
Now, gather those supplies, and dive into the delightful world of sand foam sensory play. Your children will love the experience, and you’ll find joy in their happiness. Happy crafting!
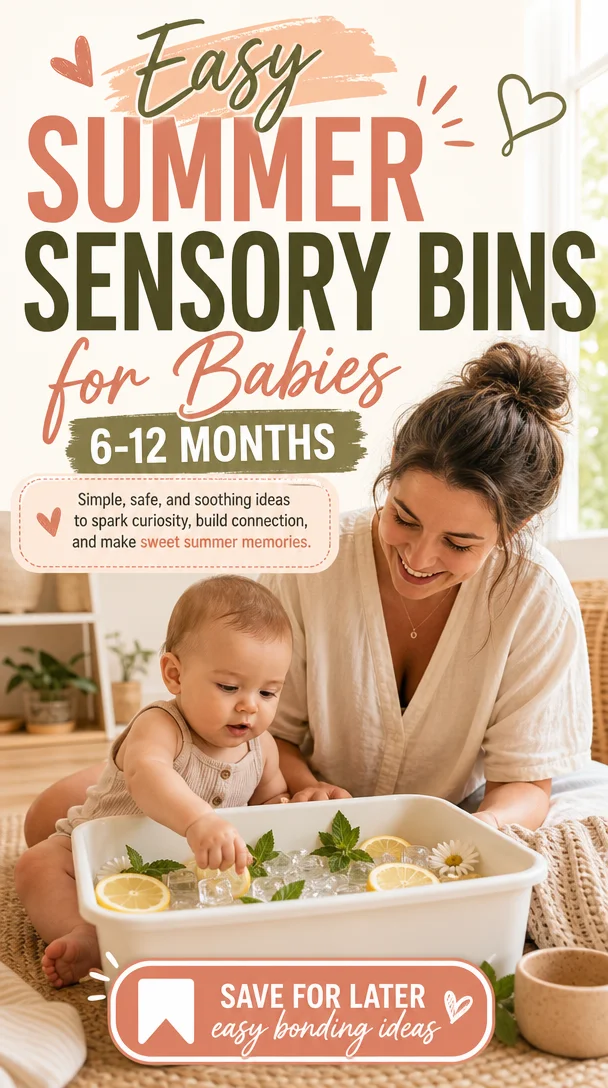
Easy Summer Sensory Bins for Babies 6-12 Months
Summer Sensory for Infants: Engaging Sensory Bins for 6-12 Months
Meta Description
Explore delightful summer sensory bins for infants aged 6-12 months. Discover engaging activities that boost development and create joyful, messy memories!
Introduction
Ah, summer days! The sun shines bright, outdoor adventures await, and yet, as parents of little ones, we sometimes wonder how to keep our babies entertained during those hot months. If you have an infant between 6-12 months, you know they love to explore the world around them. But let’s face it—playing outside can feel a bit overwhelming when you’re wrangling a tiny human who’s just discovered the wonders of their senses.
That’s where summer sensory bins come into play! They offer a fantastic opportunity for sensory exploration right in the comfort of your home. Imagine your little one squishing, splashing, and experimenting with different textures—all while you relax (or grab that much-deserved cup of coffee). In this guide, let’s delve into the beauty of summer sensory bins for infants, packed with practical ideas, easy setups, and heartfelt encouragement. You’ve got this, and I’m here to help!
The Benefits of Sensory Play for Infants
Sensory play is not just for fun; it’s a vital part of your baby’s development. Engaging in sensory activities nurtures their curiosity and helps them develop critical skills such as:
- Motor Skills: Gripping, pouring, and manipulating different materials enhances fine motor skills.
- Cognitive Development: Exploring textures and tastes introduces concepts of cause and effect.
- Emotional Growth: Sensory play promotes feelings of joy, leading to happier and more relaxed babies.
- Social Interaction: Sharing materials and playing together fosters connection and bonding.
Setting Up Your Summer Sensory Bin: What You’ll Need
Creating your sensory bin is easier than it seems! Here are some simple items you can use to make the perfect tactile playground for your little one:
Bin Ideas
- Water Table: A shallow plastic container filled with water.
- Sand Bin: A container of kinetic sand or play sand for digging.
- Nature Bin: A collection of leaves, flowers, and small natural objects like pinecones and rocks.
Sensory Materials
- Water: Use cold water or warm water, adding colorful dishes or bath toys for extra fun.
- Sand: Consider adding safe toys like cups, shovels, and even spoons for scooping.
- Ice: Freeze small toys or fruits in ice blocks for a cool summer exploration.
- Plants: Use fresh herbs like mint or basil for smelling and touching.
Fun Summer Sensory Ideas for 6-12 Month Infants
Now that you know what you can use, let’s dive into some specific sensory bin themes perfect for summer!
1. Tropical Water Adventure
Fill a shallow bin with water and add colorful plastic ocean animals. You can include small cups, spoons, sand toys, or even a few splashes of food coloring for vibrant colors!
Tip: Create a shaded area outside with a blanket or umbrella to keep your baby comfortable while they splash!
2. Beach Day with Sand
Provide a bin of kinetic sand along with small beach toys. Let your baby squish, mold, and explore. Add scoops and spades to encourage mess-making!
Tip: Head outside and let your baby dig in the sand (make sure it’s safe!). Bring along some small buckets to collect treasures!
3. Nature’s Colors
Collect various natural items like leaves, flowers, and smooth stones. Create a sensory bin that introduces your child to different textures and colors.
Tip: Encourage your little one to smell the flowers and feel the leaves. The local park or garden can be a perfect place for this activity!
4. Ice Block Exploration
Freeze small toys or fruits in ice blocks. This is a wonderful way for your baby to experience temperatures and textures. As the ice melts, let them explore!
Tip: Use warm water to speed up the melting process or provide towels for the drips!
5. Sensory Soup
Fill a bin with a mixture of water, bubbles, and toys. Let your baby pour, splash, and play in a bubbly sensory soup!
Tip: Add bath toys and even some safe kitchen tools like measuring cups to enhance the fun.
Helpful Tips for Success
As with any parenting activity, we want to keep things safe and enjoyable! Here are some handy tips for sensory play with infants:
- Supervise Closely: Always stay within arm’s reach during sensory play to ensure safety, especially with water or small objects.
- Choose Non-Toxic Materials: Ensure any objects used are safe and suitable for mouthing, as infants often explore through their mouths.
- Be Ready for a Mess: Sometimes sensory play gets messy! Set up in easily cleanable spaces or outside to minimize stress.
- Follow Your Baby’s Lead: Pay attention to what your infant enjoys and let them explore at their own pace. Don’t pressure them to engage if they seem uninterested.
Encouraging Your Child’s Sensory Exploration
Helping your little one engage with sensory bins can deepen their experience and spark curiosity. Here’s how:
Ask Open-Ended Questions
Encourage your baby’s exploration by asking simple questions, even if they can’t answer yet. For instance:
- “What does that feel like?”
- “Can you splash the water?”
- “How does the sand feel on your fingers?”
Offer Gentle Guidance
If they seem unsure, demonstrate how to play, but let them take over immediately. Your excitement can be contagious!
Celebrate Little Wins
When your baby makes discoveries—like splashing water or feeling grass for the first time—celebrate with smiles and cheers! These joyful moments foster a strong emotional bond.
Create a Routine
Incorporate sensory play into your weekly routine. For instance, make Wednesdays "Sensory Play Day" where you try something new! This anticipation builds excitement.
Summer Sensory Play and Connection
Remember, summer sensory play isn’t just about sensory learning; it’s about creating meaningful moments. Infants thrive in environments filled with love and attention. Here are some connection ideas to deepen those special summer days:
- Storytime: While playing, narrate a story that incorporates their sensory experiences. "The ocean feels cool and the sand tickles your toes!"
- Hold and Explore: Encourage them to hold different objects and name them, fostering language skills.
- Music and Movement: Play gentle summer music while they play, prompting them to move and wiggle. Happy babies mean happy summer memories!
Conclusion
You’re doing an incredible job navigating the beautiful challenges of parenting. Creating summer sensory bins for your little one is a delightful way to foster development, connection, and that joyful messiness that makes childhood so magical.
As you enjoy these simple, heartfelt activities, remember that perfect parenting doesn’t exist—your love and presence are the most important gifts you can offer. So grab those bins, get creative, and savor these moments of sensory exploration. Here’s to a summer filled with laughter, messy hands, and warm, cozy memories! You’ve got this!
Optional FAQ Section
Q: Can sensory play be messy?
A: Yes, it can! But that’s part of the fun. Set up your sensory play area in a space that’s easy to clean or take it outdoors.
Q: What if my baby doesn’t seem interested in sensory play?
A: That’s perfectly normal! Follow their lead and offer different materials or activities. Sometimes engaging them in the moment can ignite their curiosity.
Q: How often should I set up sensory bins?
A: You can set up sensory bins as often as you like—try once a week to keep things fresh and exciting!
Pin It for Later!
Don’t forget to save this article for ideas on summer sensory bins for infants! Share it with your parent friends and let’s create a supportive community around joyful parenting. 💛
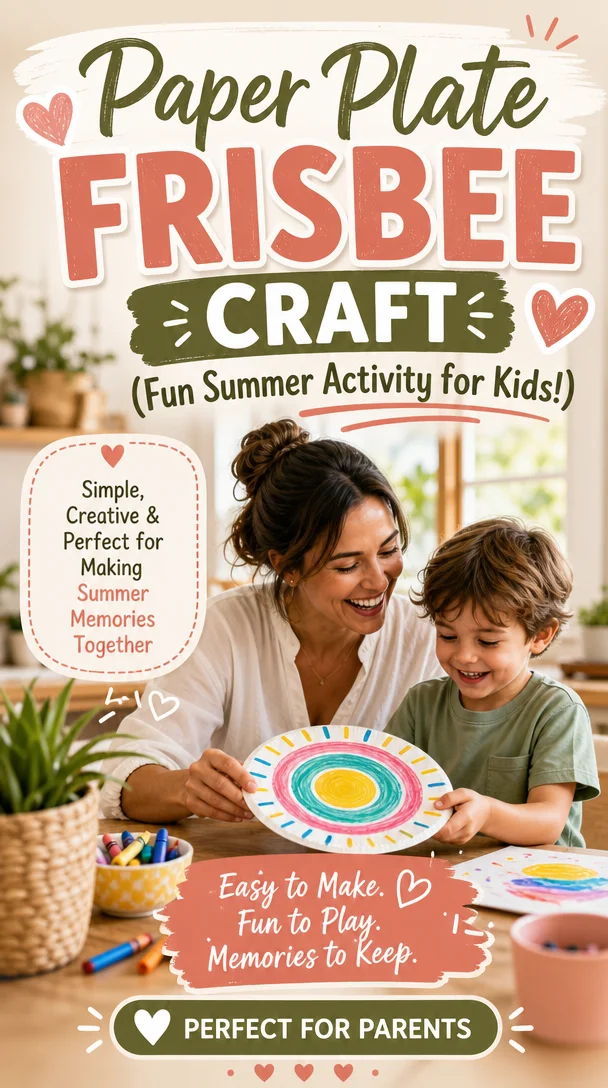
Paper Plate Frisbee Craft (Fun Summer Activity for Kids!)
Fun Summer Activity for Kids: DIY Paper Plate Frisbee Craft
Meta Description
Engage your kids with a fun DIY paper plate frisbee craft! Perfect for summer playdates and backyard fun, this easy project sparks creativity without breaking the bank.
Introduction
Ah, summer! The sun shines brightly, the days stretch long, and the kids are brimming with energy. As parents, we want to make the most of this beautiful season, but let’s be honest — keeping little ones entertained every day can feel like a monumental task. That’s where a simple yet fun idea comes into play: DIY paper plate frisbees!
Not only does this craft keep the kids creatively engaged, but it also provides an excellent opportunity for outdoor play, all while being budget-friendly. The best part? You don’t need to be an art expert to pull this off, and you get to witness those priceless, happy moments when your children race around, laughing with joy.
Let’s dive into how you can make this easy summer craft a cherished part of your family’s sunny adventures!
Why Paper Plate Frisbees?
Before we start crafting, let’s talk about why this paper plate frisbee activity is so fantastic:
- Budget-Friendly: With just a few materials, you can keep costs down while still providing hours of entertainment.
- Creative Expression: Kids can unleash their creativity by decorating their frisbees any way they please.
- Physical Activity: After making their frisbees, kids can enjoy endless outdoor fun, promoting physical fitness.
- Skill Development: This simple craft helps improve fine motor skills and hand-eye coordination.
Materials You’ll Need
Gather these easy-to-find supplies for your DIY paper plate frisbee craft:
- Paper plates: The sturdy kind works best.
- Colored markers or crayons: Bright colors make for eye-catching designs.
- Stickers: Let kids go wild with their favorite characters or themes.
- Scissors: For parents or older kids to help with cutting.
- String or yarn (optional): To create handles or attachments.
- Tape or glue: For adhering decorations and securing any additions.
- Outdoor space: A yard, park, or any open area will do!
Crafting Steps
Now, let’s get crafty! Here’s a straightforward step-by-step guide to creating your paper plate frisbees:
Step 1: Prep the Plates
Start by gathering the materials mentioned above. Hand each child a plain paper plate as their canvas. They can choose to flip it over so they decorate the bottom side first, if they like, as this adds a fun twist!
Step 2: Get Creative
Encourage your kiddos to unleash their inner artists! Here are a few decorating ideas:
- Colorful Designs: Let them use colored markers or crayons to create patterns, like stripes, polka dots, or rainbows.
- Stickers Galore: Include their favorite stickers, whether they’re superheroes, animals, or magical creatures.
- Nature-Inspired Art: Kids can draw sunflowers, butterflies, or even their favorite summer scenes.
Step 3: Add Functionality
If you want, enhance the frisbee’s functionality by cutting out a small hole in the center of the plate and looping a string through to create a handle. This adds an interactive element, making it easier for younger kids to toss and catch!
Step 4: Get Outside and Play!
Once the decorations dry (if using glue or wet markers), take the frisbees outside for some fun! Encourage kids to toss them back and forth, create target games, or even have a friendly frisbee competition.
Tips for Fun and Safety
Here are some helpful tips to make your paper plate frisbee activity even more enjoyable:
- Play with Friends: Invite over a few friends for a paper plate frisbee party. The more, the merrier!
- Set Up Games: Create target zones using hula hoops or chalk-drawn circles on the grass.
- Supervise Play: While this craft is safe, always keep an eye on younger kids during frisbee activities to ensure they play safely.
- Encourage Teamwork: Let kids work together on frisbee designs or team games. This fosters bonding and cooperation.
Encouraging Themes and Questions
While crafting and playing with the paper plate frisbees, consider sparking wonderful conversations. Here are some fun questions to ask your kids during the activity:
- What colors represent summer for you?
- If you could design your perfect frisbee, what would it look like?
- What would be the ultimate frisbee game to play, and why?
The Benefits of Outdoor Play
Let’s talk about why getting outside is crucial for kids’ well-being. Playing outdoors provides them with:
- Fresh Air and Sunshine: Vitamin D is vital for growth and development.
- Physical Health: Outdoor play promotes physical fitness, which is crucial during the growing years.
- Social Skills: Interacting with peers in a natural setting helps kids navigate social situations confidently.
Conclusion
Creating DIY paper plate frisbees isn’t just about crafting; it’s about making memories and lighting up your children’s summer days. Whether they’re busy at the craft table or running around in the yard, this fun activity brings a smile and fosters family bonding.
Remember, parenting may feel overwhelming at times, but it’s the simple moments that often shine the brightest. So, grab those paper plates, gather your supplies, and let’s get crafting! Every throw, every giggle, every bit of creativity shared fuels the joy in both your hearts as you navigate the beautiful chaos of family life.
Go ahead, enjoy this hands-on activity together — and relish in those little moments that make all the effort worthwhile. You’ve got this, and your little ones will cherish the time spent together.
Optional FAQ Section
Q: Can I use other materials instead of paper plates?
A: Absolutely! You can use sturdy cardboard, plastic lids, or even cloth to create frisbees. Just ensure the material is safe to use outdoors.
Q: What if my kids want to make more than one frisbee?
A: That’s a great idea! Encourage them to create different designs for various games. Each frisbee can represent a different theme or favorite character.
Q: How do I clean up after decorating?
A: Use wet wipes or damp cloths to clean up any mess. Having a designated craft area can help keep everything organized, making cleanup easier.
So, grab those crafting supplies and let the fun begin! Happy summer crafting! 🌞🏖️
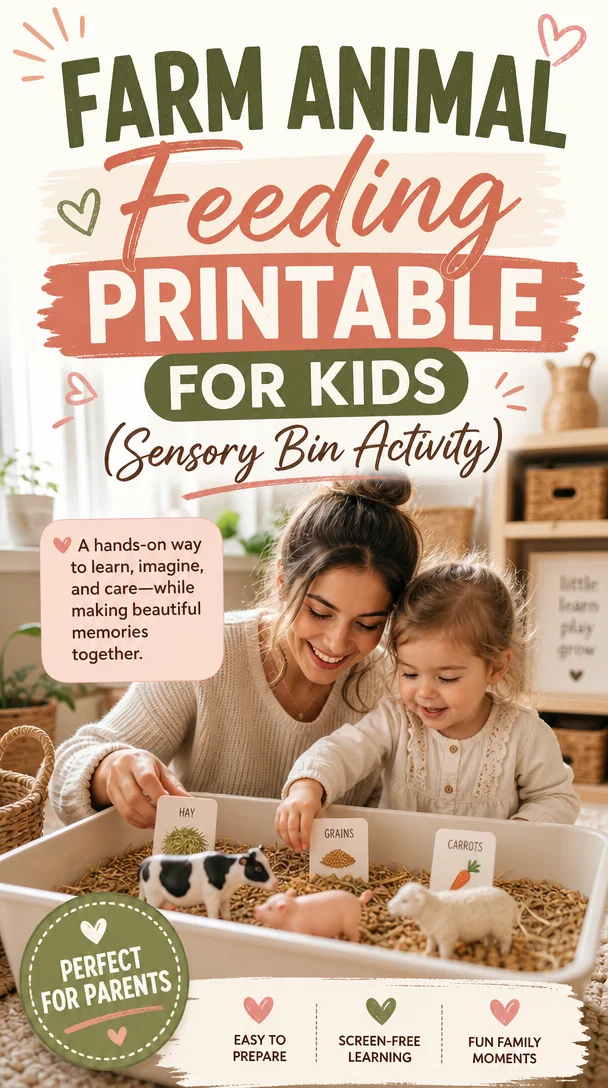
Farm Animal Feeding Printable for Kids (Sensory Bin Activity)
Engaging Farm Animal Feeding Sensory Bin Activity for Kids: Fun and Learning Combined!
Meta Description: Dive into fun with this Farm Animal Feeding Sensory Bin activity! Boost fine motor skills and learning through play with adorable animal printables.
Hey there, fellow parents! If you’ve ever felt overwhelmed while trying to engage your little ones, you’re not alone. Sometimes, it feels like we need a magic wand to transform an ordinary day into an exciting adventure. I’ve found that simple, hands-on activities can work wonders, and today, I want to share one of my favorites: the Farm Animal Feeding Sensory Bin Activity!
Imagine your child giggling as they scoop corn, rice, or oats into jars decorated with adorable farm animal faces. Not only does this activity spark joy and curiosity, but it also provides loads of benefits for fine motor skills and sensory development. Whether you’re a seasoned homeschooling parent or just looking for a fun weekend activity, this sensory bin will bring smiles and excitement to your home.
Ready to dive in? Grab a snack, and let’s get started on how to create this delightful experience for your child!
What is a Sensory Bin?
Before we jump into the Farm Animal Feeding activity, let’s take a moment to chat about sensory bins. Sensory bins are containers filled with materials that engage a child’s senses. They encourage exploration and creativity while developing fine motor skills, hand-eye coordination, and cognitive growth.
Why Sensory Play Matters
Kids learn best through play, and sensory activities like this one help to:
- Foster creativity and imagination
- Encourage problem-solving skills
- Provide opportunities for social interaction
- Reduce anxiety and stress by allowing kids to express themselves
As parents, creating immersive experiences strengthens the bond we share with our little ones while supporting their development. And the best part? Kids love it!
Farm Animal Feeding Sensory Bin: What You’ll Need
Let’s gather our supplies! Creating the Farm Animal Feeding Sensory Bin is a simple and engaging process. Here’s what you’ll need:
Materials
- Animal Printables: You can find adorable farm animal face printables online. Make sure to choose ones that will delight your little ones!
- Jars or Containers: Empty spice jars, mason jars, or similar containers work wonders for this activity.
- Base Material: Choose from corn kernels, rice, or oats. Each has its unique texture, and the kids can explore the differences.
- Scoops: Small measuring cups, spoons, or scoops make excellent tools for little hands.
- Tray or Bin: A large, shallow tray or bin keeps things tidy while allowing ample space for play.
Setting Up the Sensory Bin
Creating your sensory bin only takes a few minutes. Here’s how to do it:
-
Print and Prepare Animal Faces: Print out your farm animal face templates and cut them out. Attach them to the jars or containers with glue or tape.
-
Fill the Base Material: Pour your chosen base (corn, rice, or oats) into the bin or tray to create a sensory-rich environment.
-
Add the Jars: Arrange the jars in the bin, ensuring they are accessible for your little ones to reach.
-
Provide Tools: Place scoops and small cups beside the bin, ready for those little hands to explore.
Now you’re ready to watch the magic happen!
Engaging the Kids: Let the Fun Begin!
When your sensory bin is all set up, it’s time to get your little ones involved. Here are some ideas to maximize the fun and make the most of learning through play:
Get Creative with Playtime
-
Feed the Animals: Encourage your child to scoop the grains and feed each animal in the jars. Talk about the different animals and what they eat to incorporate some fun facts along the way.
-
Sorting Games: As your child plays, you can ask them to sort the different grains into the jars. This not only reinforces their understanding of categories but also develops cognitive skills.
-
Imaginative Play: Prompt your child to create stories about their farm animals and what adventures they might have. This subtly enhances language skills and imaginative thinking.
-
Counting and Math: Use the jars to practice counting. “How many scoops do we need for the cow? Let’s count together!”
-
Sensory Descriptions: Encourage your child to describe what they feel while playing. Is the rice smooth? Is the corn making a sound? This exercise nurtures vocabulary building and sensory awareness.
Tackle Messes with Ease
Let’s keep it real—sensory play can get messy. But as a seasoned parent, I can tell you that a little mess means a lot of fun! Here are a few tips to tackle it head-on:
-
Designate a Play Area: Set up your sensory bin in a space that can handle a little mess—like the kitchen or outside.
-
Use a Tarp or Blanket: Lay down a tarp or blanket under the bin to catch any grains that escape during play. This practice makes for easy cleanup.
-
Involve Your Child: Encourage them to help clean up afterward. It’s a great opportunity to teach responsibility while reinforcing teamwork.
Additional Tips for Success
To ensure your sensory bin experience goes smoothly, here are some extra tips!
Encourage Independent Play
Allow your child to explore the sensory bin independently. This nurturing of autonomy not only boosts their confidence but also enables self-directed learning. Just step back and observe. You’ll be amazed at how engaged they become!
Join the Fun
Sometimes, joining in on the sensory play creates the most beautiful moments. Sharing playful experiences strengthens your bond, builds lasting memories, and enhances their enthusiasm for learning.
Rotate Sensory Materials
To keep the excitement alive, rotate the materials in your sensory bin every few weeks. Try switching from corn to different textures like sand or beans, bringing new experiences to the table.
Celebrate Every Moment
Remember, parenting isn’t about perfection; it’s about enjoying the journey together. Celebrate every little win, whether it’s your child’s creativity, newfound skills, or simply the joy of learning. These moments will become cherished memories over time!
Conclusion
In wrapping up, the Farm Animal Feeding Sensory Bin Activity is much more than just a fun way to occupy your kids for a while. It’s a delightful combination of learning, sensory exploration, and bonding. By incorporating simple materials and engaging play, you nurture your child’s development without overwhelming them—or yourself.
So, grab those printables, get creative with your sensory bin, and enjoy the laughter and joy that fills your home. Remember, you’re doing an amazing job, and every small effort counts! Keep shining as the incredible parent you are.
And if you found these tips helpful, don’t forget to share your sensory bin experience with other parents. Together, we can lighten the parenting load one joyful moment at a time!
FAQs
Q: How long can I leave the sensory bin set up?
A: You can keep it set up for as long as your child remains interested! Just be sure to store the materials properly if you plan to take breaks.
Q: What if my child loses interest?
A: It’s normal for kids to fluctuate in interest. You can refresh the setup or introduce new items to re-engage their curiosity.
Q: Can I adapt this for older children?
A: Absolutely! For older kids, you can introduce more complex concepts like measuring, making patterns, or even thematic learning around farms and animals.
By embracing the fun in sensory play, you’re already paving the way for significant growth and learning in your child. Enjoy every scoop!
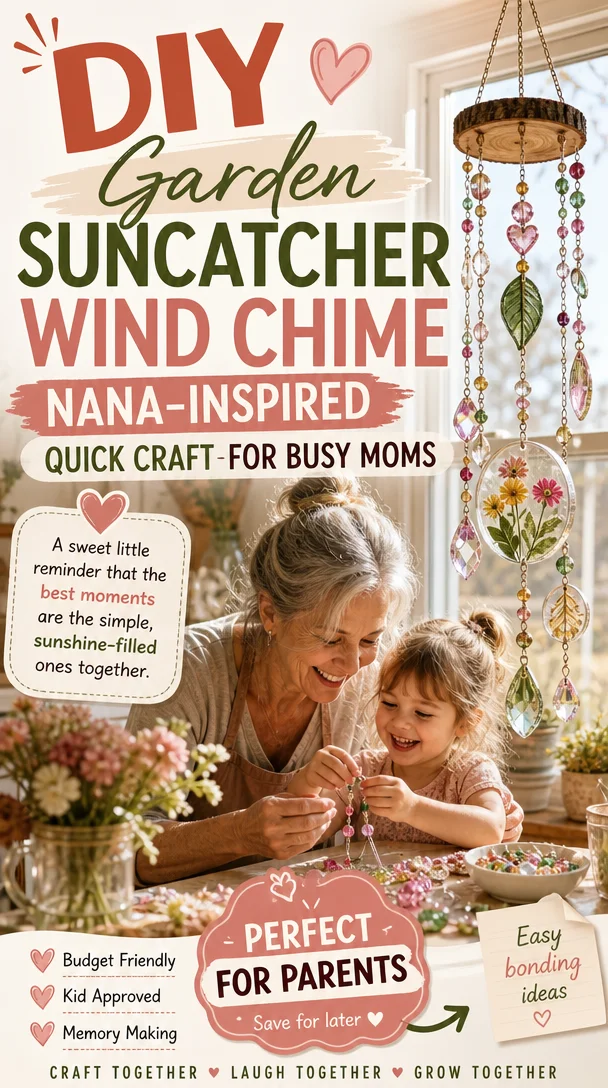
DIY Garden Suncatcher Wind Chime: Nana-Inspired Quick Craft for Busy Moms
Crafting Sunshine: Make a DIY Garden Suncatcher Wind Chime with Your Kids
Meta Description
Create magical moments outdoors with your children by making DIY Garden Suncatcher Wind Chimes. This fun and easy craft sparks creativity and joy!
Introduction
Hey there, fellow parents! 🌼 Have you ever noticed how a little sunshine can brighten up a space—both in your home and in your heart? As moms and dads, we often juggle countless responsibilities, but taking a moment to connect with our kids in nature can be a beautifully refreshing escape from the chaos.
Imagine the look on your child’s face as they craft their own unique beauty for the garden. A DIY Garden Suncatcher Wind Chime isn’t just a craft project; it’s an opportunity to bond, explore creativity, and celebrate the joy of creation together. Plus, it’s a simple, fun spring or summer activity perfect for any age!
Ready to cultivate those creativity seeds? Let’s dive into how to create these dazzling wind chimes that catch both sunshine and smiles.
Why Make a DIY Garden Suncatcher Wind Chime?
Creating DIY Garden Suncatcher Wind Chimes offers so much more than just a delightful decoration! Here are a few reasons to get those little hands busy:
1. Encouraging Outdoor Play
Getting your kids outdoors is essential for both their physical and mental health. Crafting in nature not only boosts their creativity but also invites them to explore the sights and sounds around them.
2. Promoting Fine Motor Skills
As your children handle materials like flowers and mason jar lids, they enhance their dexterity and coordination. Skills like these can benefit them in everyday tasks, from writing to playing sports.
3. Fostering Creativity
Every wind chime will be a unique reflection of your child’s imagination and personality. Letting them express themselves through art fosters their creative spirit, helping them think outside the box.
4. Creating Family Traditions
Crafting together can become a cherished family tradition. These moments form lasting memories and give your children a sense of belonging and connection.
5. Learning Through Play
Finally, this fun project provides a wonderful opportunity for children to learn about their surroundings. Identifying different flowers and colors can spark curiosity and enhance their understanding of nature.
What You’ll Need
Before we dive into the crafting details, let’s gather our supplies! Here’s what you’ll need for your DIY Garden Suncatcher Wind Chime:
- Mason jar lids (or any circular craft ring)
- Contact paper (adhesive side up)
- Flowers (fresh or dried—choose vibrant colors!)
- Scissors
- Twine or fishing line (for hanging)
- Markers or crayons (optional, for decorating the lids)
- A sunny spot (to display your creation!)
Step-by-Step Guide to Craft Your Suncatcher Wind Chime
Ready to get started? Let’s shape those your garden into a colorful wonderland! Follow these simple steps as you craft together with your little ones.
Step 1: Gather Your Materials
Head outside to explore your garden or local park! This is the perfect time for a little nature walk. Look for flowers, leaves, or any natural items that catch your eye. Talk about colors, shapes, and textures as you collect items to use in your wind chime.
Step 2: Prepare Your Mason Jar Lids
Lay out your mason jar lids and clear some space on the table. If you want to add color to your wind chimes, let the kids decorate the lids with markers or crayons. This adds a personal touch and gives them more ownership of their creation!
Step 3: Arrange Your Natural Finds
Once you have a pile of flowers and leaves, it’s time to arrange them on the adhesive side of the contact paper. Encourage your little ones to experiment with different patterns, placing smaller items in the center and larger ones around the edges.
Tips for Arrangement:
- Use vibrant colors for a cheerful appearance.
- Try layering flowers for added depth and texture.
- Talk to your kids about the various shapes and colors they’re using!
Step 4: Seal Your Creation
Carefully place another piece of contact paper over the flowers to seal them in. Press down gently to ensure everything sticks, but avoid squishing the flowers too much.
Step 5: Attach to the Mason Jar Lid
Using scissors, trim off any excess contact paper, leaving a small border around the design. Place this art piece inside the mason jar lid, ensuring it fits snugly. Secure it with twine or fishing line by threading it through the lid and tying a knot.
Step 6: Hang and Admire
Now for the most exciting part—finding a sunny spot to display your wind chime! Hang it from a tree branch, fence, or even a hook on your porch. Watch how the sunlight dances through the colors, and listen to the gentle sounds as the wind chimes in.
Helpful Tips for a Successful Craft Session
As you embark on this creative journey, here are some tips to ensure a smooth and enjoyable experience:
- Be Flexible: Every child has a unique approach to art. If they want to go wildly off-script, let them! Embrace their creativity and follow their lead.
- Set the Mood: Create an inviting atmosphere by playing soft music or setting out cozy blankets to sit on. The more relaxed the environment, the better the experience!
- Practice Patience: It’s not about perfection. Celebrate every little step, and remind your child that art is all about enjoyment.
- Make it Educational: Incorporate counting or color recognition during the craft. Ask questions like, “How many flowers do we have?” or “What colors do you see?”
Conclusion: Cherishing Every Little Moment
Creating a DIY Garden Suncatcher Wind Chime doesn’t just brighten your garden; it lights up your family bond. Each glittering suncatcher reflects not only the beauty of nature but also the love and creativity shared between you and your child.
Remember, the goal isn’t to create a perfect masterpiece—it’s about enjoying the process and making memories! You’re nurturing their artistic flair while also spending quality time together, and those moments are the true treasures of parenting.
So, gather your loved ones, take a deep breath, and dive into crafting. Celebrate the little victories and let the sunshine inspire you and your children! 🌞
Happy crafting, and may your garden be filled with beautiful colors—and memories—this season!
Optional FAQ Section
Q: Can we use other materials besides flowers?
A: Absolutely! You can incorporate leaves, beads, or any colorful craft items you have on hand.
Q: How long will this craft take?
A: The whole process typically takes about 30–60 minutes, depending on how elaborate you want to get.
Q: What if my child is too young for scissors?
A: You can handle the cutting and let them focus on arranging the materials. Teamwork makes it easier!
Remember, parenting’s always a bit of an adventure—filled with beautiful moments just waiting to be made! 🌼💛
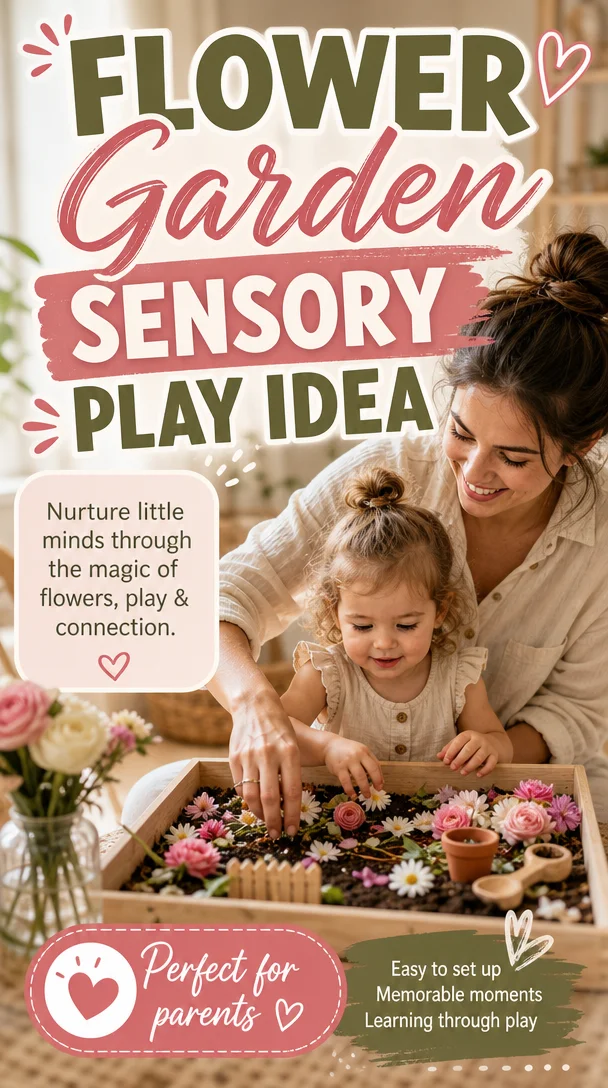
Flower Garden Sensory Play Idea
Discover the Magic of Flower Garden Sensory Play: A Heartwarming Experience for Kids
Meta Description
Engage your kids with this fun Flower Garden Sensory Bin! Discover easy steps to create a magical sensory play experience that inspires creativity.
Introduction
Hey there, fellow parent! Have you ever found yourself in a sea of toys, crafts, and endless “what do we do now?” moments, wishing for a simple way to spark creativity and joy in your children? Trust me, you’re not alone! Raising little ones can be both beautiful and chaotic, and sometimes we all need a little breather—or in our case today, something fresh and inspiring to get the family playing happily together.
Enter the Flower Garden Sensory Bin, an engaging and easy sensory play idea that allows your children to dive into a world of color, texture, and imagination. This activity not only enables kids to explore the wonders of gardening in a hands-on way, but it also provides an outlet for their sensory development, creativity, and even fine motor skills. And let’s face it, who doesn’t want a quick-win moment for both themselves and their children?
So, grab a snack, settle in, and let’s stroll through the vibrant world of sensory play with this delightful flower garden experience!
What is a Flower Garden Sensory Bin?
A Flower Garden Sensory Bin is more than just a container filled with items; it’s a creativity hub where your little ones can dig, plant, and explore different textures and colors. Think of it as a miniaturized garden that allows your kids to engage in imaginative play while also developing their senses.
Why Sensory Play Matters
Sensory play is crucial for young children as it fosters exploration and encourages them to process the world around them. Through sensory experiences, kids can:
- Enhance Motor Skills: Digging, scooping, and pouring help develop fine and gross motor skills.
- Encourage Imagination: Open-ended play stimulates creativity and storytelling.
- Stimulate Senses: Different textures and scents offer rich sensory experiences that are integral for brain development.
How to Create Your Flower Garden Sensory Bin
Ready to get started? Creating your own Flower Garden Sensory Bin requires minimal supplies and offers maximum fun. Here’s what you’ll need to gather:
Supplies You’ll Need
-
A Container: Use a shallow bin or plastic tub. Clear ones are awesome as kids can see the colorful items inside!
-
Base Materials: Start with a base like soil, sensory sand, or colored rice to mimic garden soil. For a sensory twist, consider adding some potting mix or play dough.
-
Plastic Flowers and Seeds: Use plastic flowers for fun visuals. Don’t forget some toy seeds—these can be actual craft beads or pom-poms.
-
Gardening Tools: Get small shovels, brushes, and watering cans. You can easily find these at a craft or dollar store!
-
Scoops and Bowls: Include measuring cups or scoops to encourage pouring and transferring.
-
Natural Elements: If you’re feeling adventurous, you can add small pebbles, sticks, or even real flower petals to add different textures.
Step-by-Step Instructions
Now that you have your supplies ready, let’s put this bin together:
-
Prepare the Base: Fill your container with the base material. Aim for about 3-4 inches deep, allowing plenty of room for digging and exploring.
-
Add the Elements: Distribute the plastic flowers and any natural elements evenly across the base. Feel free to hide some seeds in the soil for an element of surprise!
-
Include Tools: Toss in the gardening tools, scoops, and any other items you want to encourage kids to use freely.
-
Engage Your Kids: Present the sensory bin to your children and allow them to explore independently. Ask them open-ended questions about what they see, feel, and want to create.
Making It Special: Tips for Engagement
Once you have your Flower Garden Sensory Bin assembled, consider these tips to enrich the experience further:
Invite Imagination
Encourage storytelling! Let your kids create a narrative around their garden. What flowers are they planting? What’s happening in their magical garden world? You might say something like, “What do you think is hiding beneath the soil?”
Introduce Routine Play Activities
Add some structure to playtime by introducing small challenges. For instance, ask them to plant five flowers in one row or to scoop a specific number of ‘seeds’ from one bucket to another. This can gently incorporate counting or simple math!
Keep It Seasonal
Change your bin’s theme based on the seasons. During spring, introduce pastel colors; in autumn, explore earthy tones with leaves. This not only keeps the activity fresh but also teaches kids about the cycles of nature.
Helpful Tips for Success
-
Supervision is Key: Always supervise your kids during sensory play. They may want to taste everything, and it’s a great time for gentle reminders about what’s safe.
-
Embrace the Mess!: Sensory play can get messy, and that’s OK! Lay down a protective mat under your bin to make clean-up easier, and remind yourself that mess often equals fun!
-
Incorporate Learning: Use this time to introduce new vocabulary words, like ‘soil,’ ‘petal,’ or ‘gardening’, making it both educational and entertaining.
Conclusion: Nurturing Little Moments of Joy
As parents, we wear many hats, and some days just getting through the routine feels like an achievement. However, introducing simple and joyful activities like the Flower Garden Sensory Bin can create lasting memories and provide your children with invaluable experiences. Remember, you don’t need to be a perfect parent to raise happy, loved kids—sometimes, it’s these little moments that ignite their imagination and inspire growth.
So, I encourage you to try this sensory play idea! Dive into those messes, celebrate the small wins, and remember—the world of parenting is as much about enjoying the journey as it is about teaching and guiding our children.
Happy gardening, my friends! 🌼
Optional FAQ Section
Q: How long can I expect my kids to play with the sensory bin?
A: Engagement can vary, but most kids will find joy in it for at least 30 minutes to an hour. Rotate out elements occasionally to keep the interest alive!
Q: Can I introduce this idea with older kids?
A: Absolutely! Adjust the complexity by encouraging older children to create intricate designs, share gardening tips, or incorporate mini gardening projects.
Q: What if my child has allergies to certain plants?
A: Always err on the side of caution. There are plenty of synthetic flower options available, and you can always just skip using any natural materials altogether if in doubt.
So, what are you waiting for? Grab those supplies and start your flower garden adventure today!
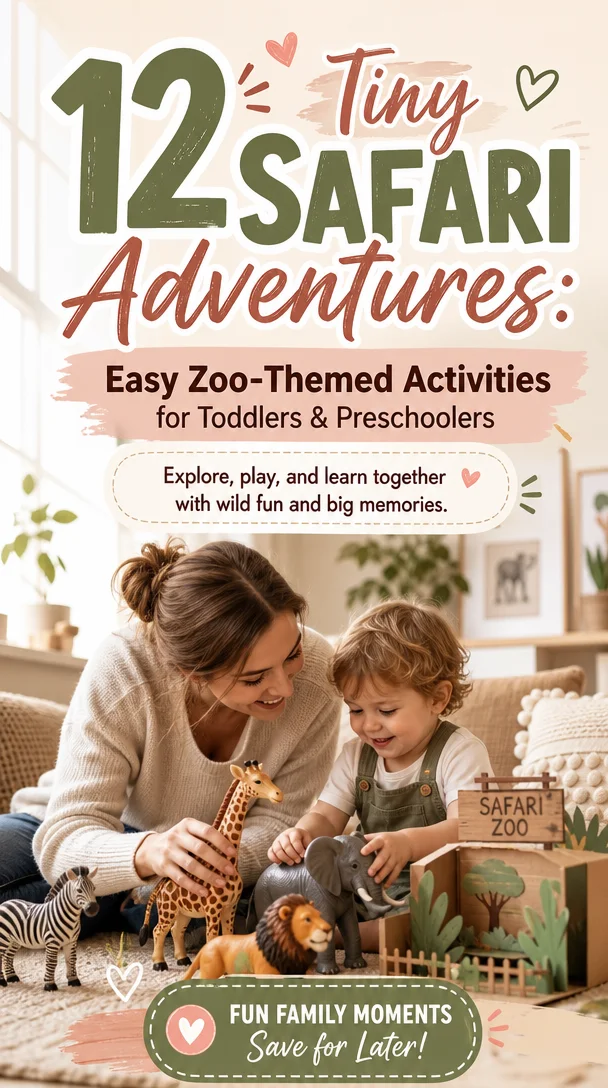
Tiny Safari Adventures: 12 Easy Zoo-Themed Activities for Toddlers & Preschoolers
10+ Safari Activities for Preschool: Wild Adventures for Little Explorers
Meta Description: Discover 10+ fun and engaging safari activities for preschoolers! Perfect for sparking creativity and love for wildlife while learning through play.
Has your little one ever looked up wide-eyed at the animals in a picture book or at the zoo, asking a thousand questions about the wild? When our kids express curiosity about the world around them, it feels like a whirlwind of excitement, doesn’t it? But often, the challenge lies in how to channel that enthusiasm into productive and fun activities.
That’s why I’m thrilled to share 10+ safari activities for preschool that will whisk your little explorers away on an imaginative adventure! From zoo-themed crafts to wild animal activities, these engaging ideas will not only keep your toddlers entertained but also nurture their curiosity and spark a love for wildlife. So, grab a comfy spot, and let’s dive into the world of safari adventures!
1. Safari Animal Mask Making
H3: Unleash Creativity with Animal Masks
What’s more fun than transforming into your favorite animal? Grab some construction paper, scissors, and markers to create masks of wild animals like lions, elephants, and zebras. Your kids can cut out large animal faces, decorate them with vibrant colors, and even embellish them with textures like fur or feathers!
Helpful Tips:
- Get Creative: Encourage your child to decorate their mask with items from nature, like leaves or twigs, to enhance the safari feel.
- Use Imagination in Play: Once the masks are done, have a mini animal parade around the house. This can lead to imaginative play where they mimic animal sounds and movements!
2. Safari Scavenger Hunt
H3: Go Wild with a Scavenger Hunt
Transform your backyard or living room into an African safari with a fun scavenger hunt! Prepare a list of safari-themed items for your kids to find, such as toy animals, animal prints, or even household items that resemble safari gear.
Helpful Tips:
- Create Clues: Break it down by ages; for younger children, use pictures of the items, while older children can have written clues.
- End with a Safari Snack: Celebrate their achievements with snacks. How about animal-shaped crackers or jungle-themed fruit kabobs?
3. Safari Storytime and Puppet Show
H3: Bring Stories to Life
Select some captivating safari-themed storybooks and have a cozy storytime. You can choose characters like adventurous explorers or wild animals. After reading, engage your kids in a puppet show using socks or paper bags to act out the stories!
Helpful Tips:
- Utilize Improv: Invite your children to create their own endings to the stories or introduce new characters. This instills creativity and confidence in speaking!
- Interactive Learning: Discuss the animals they read about — where they live, what they eat, and their habitats.
4. Nature Walk Safari
H3: Go on a Real Safari Adventure
Plan a nature walk in your local park or nearby nature reserve, and explore habitats right in your neighborhood! Equip your little explorers with binoculars and a nature journal to document their findings.
Helpful Tips:
- Encourage Observation: Ask your kids to look for animal tracks, birds, or specific plants. You can even create a checklist of things to spot.
- Capture Moments: Bring along a camera or use your phone to capture pictures. Later, you can create a scrapbook of their wild adventure.
5. DIY Safari Sensory Bin
H3: Explore Textures and Shapes
Create a sensory bin filled with materials like sand, dirt, or grass to represent the safari environment. Add toy animals to inspire imaginative play!
Helpful Tips:
- Use Everyday Items: Dry rice, beans, or pasta can serve as substitutes for sand.
- Incorporate Learning: Teach them about each animal they uncover and talk about their traits.
6. Safari Dance Party
H3: Move Like the Animals!
What better way to celebrate all things safari than a dance party? Play animal-themed music and challenge the kids to dance like their favorite wild animals.
Helpful Tips:
- Create a Playlist: Use songs that mention animals or have fun rhythms that the kids can mimic.
- Add a Freeze Dance Twist: When the music stops, let the kids freeze like their chosen safari animal.
7. African Safari Crafts
H3: Fun Crafts to Foster Creativity
Engage your kids in crafting African prints using stamps or painting. They can use fruits and veggies to create unique patterns that resemble traditional African art.
Helpful Tips:
- Incorporate Background Stories: Share tales about African cultures and wildlife as they create, fostering a greater understanding of the world.
- Display Their Art: Create a family art gallery to showcase their masterpieces.
8. Safari-Themed Cooking
H3: Cook Up Some Fun
Whip up some safari-themed snacks! Think animal-shaped sandwiches, fruit kabobs, or jungle juice smoothies. Let the kids join in; they’ll love the hands-on experience!
Helpful Tips:
- Nutrition Twist: Use this opportunity to introduce new fruits or vegetables. Ask your kids to help pick them out at the store.
- Creative Plating: Present the food in creative ways that resemble a jungle feast!
9. Wild Animal Bingo
H3: Make Learning Fun with Bingo
Create a bingo card featuring different safari animals and have fun playing Bingo! This activity sharpens recognition and memory skills while being a blast to play.
Helpful Tips:
- Educate While Playing: Share interesting facts about each animal as they check them off their cards.
- Host a Family Game Night: Invite siblings or parents to join in, turning it into a lively family activity!
10. Safari Relaxation Yoga
H3: Calm and Center with Animal Poses
Instill balance and relaxation in your routine with safari-themed yoga. Use animal poses to stretch and breathe like lions, frogs, or elephants.
Helpful Tips:
- Introduce Mindfulness: Teach children to focus on their breathing while adopting their animal pose. This encourages emotional regulation.
- Add a Story: Pair yoga with storytelling. “Let’s be tall like the giraffe, reaching for the leaves!”
Conclusion
As parents, we often walk through a whirlwind of daily challenges and joys—each moment a unique adventure. By introducing these 10+ safari activities for preschool, you not only create engaging experiences that deepen connections but also spark a sense of wonder in your little ones. Remember, it’s the small, joyful moments that build lasting memories.
So, embrace the chaos, celebrate the small wins, and make room for creativity in your family’s daily routine. You’re doing an amazing job navigating this journey called parenting. With a little wild imagination, everyday life can turn into a safari of joy, laughter, and learning.
Optional FAQs
Q: How can I adapt these activities for different age groups?
A: Tailor activities based on your child’s developmental level. Younger kids might enjoy simpler crafts, while older kids can take on more complex projects.
Q: What if I don’t have a backyard?
A: No worries! Many of these activities can be adapted for an indoors. Consider using spaces at home creatively.
Q: How can I incorporate technology while still keeping it educational?
A: Use nature apps to identify plants or animals during your nature walk, turning it into an interactive learning experience!
By engaging with these ideas, you bring a little more joy, laughter, and love into your parenting journey. Happy exploring!
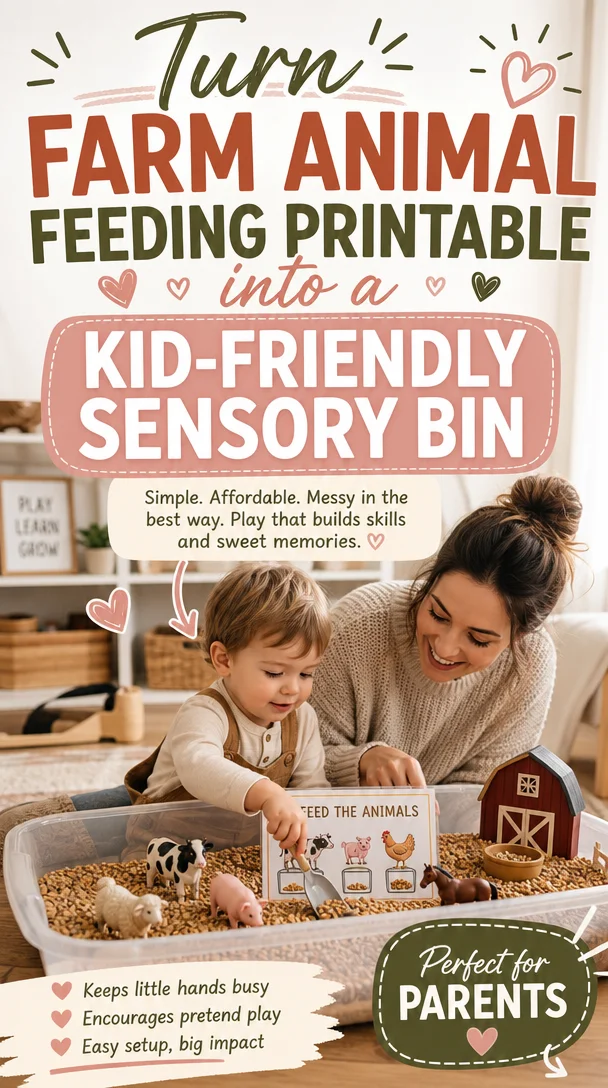
Turn Farm Animal Feeding Printable into a Kid-Friendly Sensory Bin
Engage Your Little Ones: Farm Animal Feeding Printable for Kids (Sensory Bin Activity)
Meta Description
Discover a fun Farm Animal Feeding Sensory Bin Activity! With free printables, help your kids enhance fine motor skills while enjoying sensory play!
Introduction
Ah, parenting! It’s like juggling while riding a unicycle—exhilarating yet challenging. Do you ever catch your little ones lost in their own world, making delightful messes with simple things? I completely understand—transitions into play can often feel overwhelming, yet they hold such magic! Today, I want to share a sensory bin activity that will make your kiddo’s eyes light up while keeping the chaos contained.
The Farm Animal Feeding Sensory Bin Activity is a perfect blend of fun and learning. It’s an engaging way for children to develop their fine motor skills while discovering the wonderful world of farm animals. So, grab your favorite cozy beverage, take a seat, and let’s dive into how to create this delightful activity!
What is a Sensory Bin?
Sensory bins are engaging play areas filled with materials that stimulate the senses. They invite kids to explore textures, sounds, and even smells, enhancing their sensory development. Unlike traditional toys that dictate their play, sensory bins give children the freedom to express their creativity, making every moment an adventure!
Why Farm Animal Feeding?
Farm animals captivate children’s imaginations. Their sounds, textures, and colors intrigue even the youngest explorers. By incorporating a feeding activity, you not only spark their interest but also create a fantastic hands-on experience. Children can practice scooping, pouring, and feeding—all while discovering what each animal eats. It’s a win-win!
Getting Started: What You Need
Before we get all excited about the fun, let’s gather our supplies! Here’s a quick checklist to help you prepare:
- Free Printable Farm Animal Faces: These are essential for bringing your sensory bin to life. You can find adorable printable templates online that you can cut out and stick on jars.
- Containers/Jars: Use small jars, bowls, or recycled containers to hold the "food".
- Sensory Materials: Choose from options like dried corn, rice, oats, or even shredded paper. Each offers a unique texture and sound.
- Scoopers: Provide small scoops, cups, or even spoons for your kids to use while “feeding” the animals.
- Tablecloth or Tray: Set up your sensory bin area with a splash mat or tablecloth to catch any spills.
- Optional – Small Farm Animal Figures: If you have any cute animal figurines, include them for even more play!
Setting Up Your Sensory Bin
- Prepare the Printables: First, print out the adorable farm animal faces. Cut them out and glue or tape them to your containers or jars. Each jar will represent a different animal.
- Pour Your Sensory Material: Next, fill the jars with your chosen sensory materials. I love using corn for pigs, rice for chickens, and oats for horses—each correlates with the animals that eat them!
- Create a Play Area: Set up your sensory bin on a table or tray. Invite your little ones to explore, and watch them engage with each element as they discover what each animal eats.
How to Encourage Learning Through Play
Now that your sensory bin is ready, how can you make the most of this activity? Here are some practical tips to enhance the experience:
Engaging Questions
Ask open-ended questions to promote language development and thinking skills. For example:
- “What do you think the pig likes to eat?”
- “How does this rice feel in your hand?”
Demonstrate and Model
Allow your little ones to watch how you scoop and pour. Demonstrate how to feed the animals, reinforcing the connection between the animal and their food. Make it a fun game! Pretend to hear the sounds of each animal as you feed them, bringing the experience to life.
Encourage Group Play
If you have multiple children, involve them all! Group play enhances social skills and teamwork. Create a challenge by timing how quickly they can feed the animals or see who can fill their jar first.
Incorporate Learning Themes
Use the sensory bin as a springboard for lessons on animal habitats, sounds, and even their life cycles. For instance, after feeding, ask them where they think cows live or what noise a sheep makes.
Additional Activities to Try
You might also consider these activities for more fun and learning:
- Animal Sounds Game: After the sensory play, have your children identify each animal by its sound.
- Story Time Integration: Read a story about farm animals to extend the learning. “Click, Clack, Moo” is a favorite!
- Nature Walk: If possible, visit a nearby farm or petting zoo for real-life experiences. Discuss what animals eat and see if it matches your sensory bin!
Helpful Tips to Enhance the Experience
While sensory play can get a bit messy, it’s also incredibly rewarding! Here are some helpful tips to keep the activity enjoyable and stress-free:
Use a Splash Mat
Consider laying down a waterproof mat or old sheet to collect spills and messes. This makes clean-up easier and allows for stress-free exploration.
Keep It Short and Sweet
For younger kiddos, limit the sensory bin time to about 15-20 minutes to maintain their interest. Follow their lead—if they’re captivated, feel free to extend the activity!
Review and Reflect
After the activity, take a moment to discuss what they enjoyed and what they learned. Did any animals stand out to them? This reflection fosters communication skills and builds their understanding.
Storage Options
When the fun is over, store the materials in a designated bin for future use. Encourage your child to help clean up as part of the routine and ease of access for the next play session!
Encouraging Conclusion
As you embark on this Farm Animal Feeding Sensory Bin Activity, remember that parenting doesn’t have to be perfect to be wonderful. Every little connection you create with your children matters. Whether it’s through messy play or exploring the world of farm animals, these moments leave lasting impressions.
When you observe their eyes fill with curiosity or hear their delighted squeals of joy, know you are doing a fantastic job! Embrace the chaos, celebrate the small wins, and keep making memories together.
So, the next time your little one asks what’s for lunch, why not throw a farm animal feeding party? It could be as easy as pulling out that sensory bin! Enjoy every moment and remember, you are not alone on this parenting journey. Let’s make it lighter, warmer, and more joyful—one little moment at a time!
FAQ
Q: What age is this activity suitable for?
A: This sensory bin activity is perfect for toddlers and preschoolers, typically ages 2-5.
Q: Can I adapt this sensory bin for older kids?
A: Absolutely! You can turn it into a more complex game for older children by introducing math concepts, such as counting or sorting.
Q: How can I change the sensory materials?
A: Feel free to swap out different materials based on seasonal themes or holidays, such as adding colorful fall leaves in autumn or snowflakes made from cotton balls in winter!
Q: What if we don’t have farm animal figures?
A: No problem! Your kids can use the printables alone and let their imagination take over. Paper cutouts can still create immersive play.
Let’s make parenting feel a little easier and embrace the beauty of the everyday chaos together! Happy feeding!
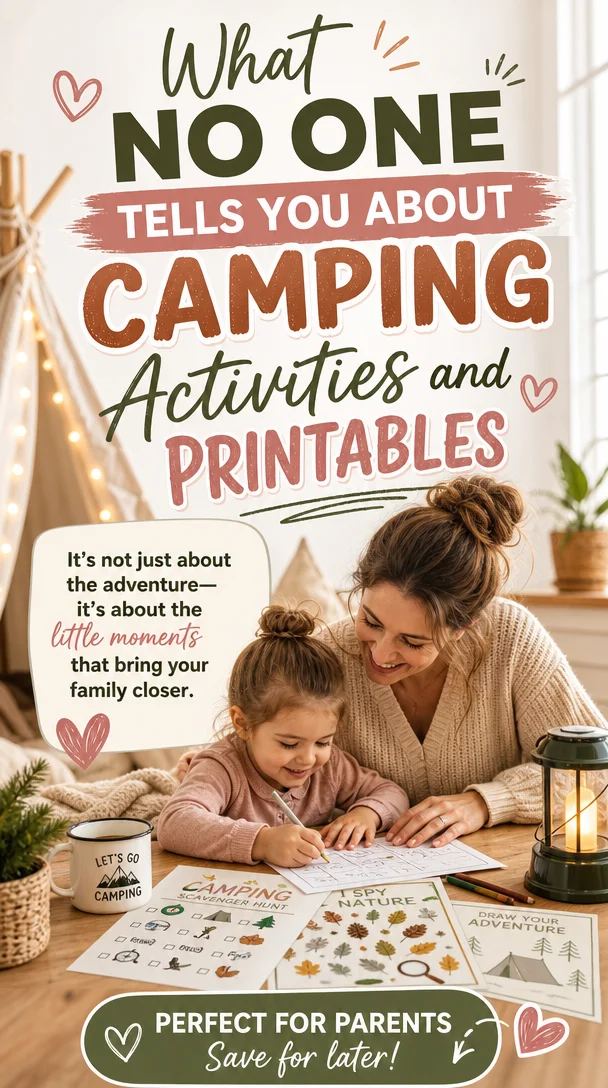
What No One Tells You About Camping Activities and Printables
Camping Activities and Printables: Make Summer Unforgettable!
Meta Description
Discover fun camping activities and printables to make summer memorable. Create magical family moments while exploring nature together—hassle-free!
Introduction
Ah, summer. The sun shines brighter, the days stretch longer, and the whole world seems to beckon families outside for adventure. As parents, we strive to make lasting memories with our kids, and what better way to do that than by exploring the great outdoors? Camping offers an amazing chance for family bonding, and trust me, the warmth of a crackling campfire and the peace of nature can work wonders on your family’s spirit.
But let’s be honest: organizing a camping trip—especially with little ones in tow—can feel daunting. You might worry about what to pack, how to keep everyone entertained, or even how to prevent meltdowns in the middle of the woods. Fear not! I’ve got your back with some fantastic camping activities and printables that will add tons of fun without the stress. So grab a snack, settle in, and let’s dive into a world of camping magic!
Why Camping is Great for Families
Camping lets families connect in ways that can be challenging during busy school years. Being surrounded by nature opens up opportunities for meaningful conversations, teamwork, and creativity. When you’re away from screens and schedules, you can truly immerse yourselves in each other’s company.
Let’s explore some engaging camping activities and useful printables that will make your summer camping trips bright and fun!
H2: Essential Camping Activities Your Kids Will Love
Keeping your little adventurers engaged during your camping trip is key to a successful family getaway. Here are some simple yet delightful activities to try!
H3: Nature Scavenger Hunt
Kids love finding treasures in nature, and a scavenger hunt is a fun way to get them excited about their surroundings. Create a list of items that can be found around your campsite, such as different types of leaves, pine cones, or interesting rocks. Print out the scavenger hunt checklist as a printable for them to check off as they explore.
Example Items for Your Checklist:
- A round rock
- Something that smells good
- A feather
- Three different types of leaves
This activity fosters observation skills and curiosity while encouraging your kids to actively engage with their environment.
H3: Campfire Storytelling
Gather around the campfire in the evenings for a delightful storytelling session. Encourage each family member to share a story—whether it’s a favorite memory, a made-up adventure, or a spooky tale. You could even create a storytelling theme for each night: fantasy, adventure, or personal experiences.
Pro Tip: For little ones who might feel shy, prompt them with questions like, “What would you do if you found a treasure map in the woods?”
H2: Arts and Crafts in Nature
Finding creative ways to engage children while camping can lead to beautiful moments together. Try out these crafty ideas during your downtime!
H3: Nature Art
Gather leaves, twigs, flowers, and stones, and let your kids create nature-inspired art pieces. They can press leaves into paper or create mosaics using various found objects. This hands-on activity sparks creativity and keeps kids engaged with the surrounding environment.
Printable: Consider providing a nature imprint paper with outlined shapes where your kids can create their artwork.
H3: Nature Journaling
Encourage your kids to observe their surroundings closely by starting a nature journal. Help them document their discoveries daily by drawing pictures or writing about their experiences.
Example Prompt: “Today we spotted a squirrel building a nest! It reminded me of what I would do with my own adventures. What would your squirrel dream house look like?”
H2: Family Team-Building Activities
Camping is a fantastic way to build teamwork and communication. Here are a couple of enjoyable group activities for families:
H3: DIY Obstacle Course
Set up a simple obstacle course using items around your campsite. Use ropes, cones, and even picnic benches for challenges. Take turns racing against each other while cheering everyone on. Not only will this be a fun physical challenge, but it also promotes teamwork!
H3: Cooking Together
Involve everyone in preparing meals over the campfire. Kids can help with safe tasks like washing vegetables or assembling sandwiches. To spice things up, create a cooking competition where each family member gets to design their own dish with limited ingredients.
Note: Keep safety a priority, especially when using knives or fire. Teaching children proper cooking techniques creates lasting memories!
H2: Engaging Camping Printables
Printables can simplify your camping experience, allowing for more fun and less fuss. Here are some useful camping printables to have on hand:
H3: Camping Checklist
Create a camping checklist to ensure you’ve packed everything your family needs. This can include items like tent supplies, cooking gear, and clothing. As you check things off, you’ll feel organized and ready for adventure!
H3: Adventure Bingo
Create a bingo card filled with various camping activities or nature sights. Each time you complete an activity (like roasting marshmallows or spotting a deer), players can mark it off. This not only encourages participation but adds an element of friendly competition.
Empowering Tips for a Stress-Free Camping Experience
While camping is all about having fun, some preparation can ease the journey. Here are some practical tips for a smooth family trip:
- Plan Meals: Before you go, outline your meals and snacks. Having a clear menu reduces the stress of last-minute decisions and makes grocery shopping easier.
- Pack Smartly: Use packing cubes to stay organized. For each family member, create a cube with their clothes, toiletries, and other essentials.
- Talk Through Expectations: Before hitting the road, have a family chat about what everyone is looking forward to. Discuss any worries or fears, especially for kids who might feel anxious about camping.
- Stay Flexible: Nature has its own rhythm, and things may not always go as planned. Embrace the unexpected, and remember that the journey is just as important as the destination!
Conclusion: Create Magical Moments in Nature
As you and your family step into the great outdoors this summer, hold onto the beauty of simplicity and connection. Camping offers the unique opportunity to bond over shared experiences and enjoy the little moments that might otherwise slip by in the hustle of everyday life.
With fun activities and printables, you’ll keep your kids engaged while creating memories you’ll treasure for years to come. Remember, it’s all about enjoying the journey and celebrating each other along the way.
So get out there and embrace the magic of family camping! You’ve got this.
FAQ Section
Q: What age is appropriate for taking kids camping?
A: Kids of all ages can enjoy camping, but it’s important to pick a location that suits your child’s needs and comfort level. If you’re new to camping, consider starting with a family-friendly campground.
Q: How can I keep my child entertained during down time?
A: Bring along books, art supplies, or puzzle games for quiet activities. Having a few engaging options ready ensures boredom doesn’t set in.
Q: What’s the best way to handle unexpected weather?
A: Always check the weather beforehand and pack accordingly. If it rains, have backup indoor activities ready, like card games or crafts. There’s often magic to be found, even on cloudy days!
Feel free to adjust the content as needed, and happy blogging!